

Change Page Orientation in Microsoft Word: A Quick Guide
Change page orientation microsoft word – Change page orientation in Microsoft Word is a simple yet powerful tool that can dramatically impact the visual appeal and readability of your documents. Whether you’re crafting a professional report, a creative presentation, or a personal letter, understanding how to switch between portrait and landscape orientations can elevate your work.
This guide will walk you through the essential steps, explore advanced techniques, and provide tips for optimizing your documents for both print and digital formats.
Imagine a document with tables and charts that extend beyond the page margins. By switching to landscape orientation, you can accommodate the content without sacrificing readability. Or perhaps you’re designing a flyer that requires a more horizontal layout. With just a few clicks, you can transform your document’s appearance and achieve the desired visual impact.
Understanding Page Orientation in Microsoft Word: Change Page Orientation Microsoft Word

Page orientation refers to the way your document is displayed on the page. It can be either portrait or landscape, and choosing the right orientation can significantly impact the visual appeal and readability of your document.
Portrait Orientation
Portrait orientation is the default setting in Microsoft Word, where the page is taller than it is wide. This orientation is ideal for documents that are primarily text-based, such as letters, reports, and essays.
Sometimes, you need to change the page orientation in Microsoft Word to fit a specific layout, like when you’re creating a landscape flyer. But, if you’re looking for a more creative way to organize your home, you might want to try a leather copper cup organizer DIY project.
This is a great way to add a touch of rustic charm and keep your mugs and cups organized. Once you’ve finished your DIY project, you can even print out instructions or a design on your computer using Microsoft Word and choose the perfect page orientation for the project.
- Enhanced Readability:Portrait orientation provides a more natural reading experience, especially for longer documents. It allows readers to easily scan the text vertically, improving comprehension and reducing eye strain.
- Space Optimization:Portrait orientation utilizes the page space efficiently, particularly when dealing with large amounts of text. It minimizes the need for excessive page breaks, ensuring a smooth flow of information.
- Standard Format:Portrait orientation is the standard format for most printed documents, making it universally recognized and accepted.
Landscape Orientation
Landscape orientation is the opposite of portrait, where the page is wider than it is tall. This orientation is best suited for documents that contain large images, tables, or charts.
Sometimes, when I’m working on a document in Microsoft Word, I need to change the page orientation to landscape for a table or image. It’s like when you’re viewing a piece of art – sometimes you need to step back and see it from a different perspective.
That’s what reminded me of the Adams Asian Art Viewing Continues article I read recently, which discussed how the way we view art can be influenced by the space it’s displayed in. Just like art, sometimes a document needs to be viewed in landscape to fully appreciate its contents.
So, whether it’s a Word document or a piece of art, changing your perspective can often lead to a new appreciation.
- Visual Impact:Landscape orientation allows for the display of wide images, charts, and tables without compromising their visual impact. It creates a more immersive and engaging experience for the reader.
- Improved Data Visualization:For documents that involve complex data visualization, landscape orientation provides more space to present information effectively. It enables the use of larger charts and tables, facilitating better data interpretation.
- Suitable for Presentations:Landscape orientation is commonly used for presentations, as it allows for wider slides and better visibility of images and text when projected.
Changing Page Orientation in Microsoft Word
Page orientation refers to the layout of a document, whether it’s displayed horizontally (landscape) or vertically (portrait). In Microsoft Word, you can easily change the orientation of a single page, the entire document, or specific sections. This flexibility allows you to create documents that best suit your content and presentation needs.
Sometimes, when I’m working on a Word document, I need to switch the page orientation from portrait to landscape. It’s a simple task, but it always reminds me of that time I went to the Pachamama Group’s Vietnamese Breakfast Pizza brunch.
It was the most unique and delicious brunch I’ve ever had , and I couldn’t help but think about how the pizza would look on a landscape-oriented page. Anyway, back to the page orientation, it’s all about finding the right layout for your document, just like finding the perfect brunch spot.
Changing the Orientation of a Single Page
To change the orientation of a single page, you’ll need to navigate to the page break where you want to apply the change.
- Place your cursor at the beginning of the page you want to change.
- Go to the “Layout” tab on the ribbon.
- Click on the “Breaks” drop-down menu and select “Page Break.”
- Now, select the “Page Layout” tab.
- In the “Page Setup” group, click on the “Orientation” drop-down menu.
- Choose either “Portrait” or “Landscape” based on your preference.
Changing the Orientation of an Entire Document
If you need to change the orientation of the entire document, follow these steps:
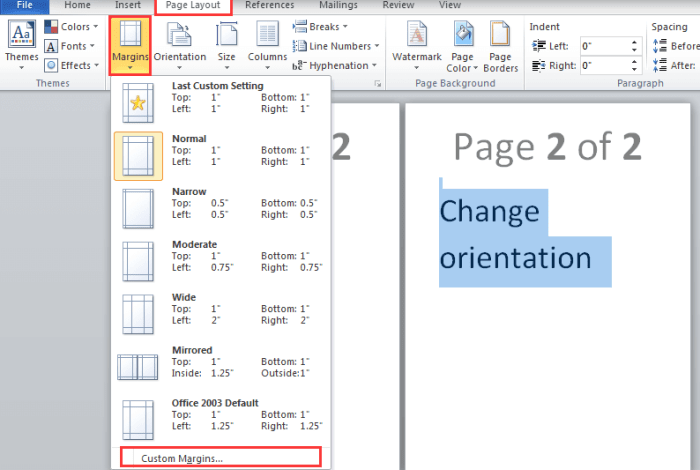
- Go to the “Page Layout” tab.
- In the “Page Setup” group, click on the “Orientation” drop-down menu.
- Select either “Portrait” or “Landscape” to apply the desired orientation to the entire document.
Applying Different Orientations to Specific Sections
For situations where you need to apply different orientations to specific sections of your document, follow these steps:
- Place your cursor at the beginning of the section where you want to apply the change.
- Go to the “Layout” tab on the ribbon.
- Click on the “Breaks” drop-down menu and select “Section Break (Next Page).” This will create a new section starting on the next page.
- Repeat steps 4-6 from the “Changing the Orientation of a Single Page” section to apply the desired orientation to the newly created section.
- Continue adding section breaks and applying different orientations as needed throughout your document.
Advanced Page Orientation Techniques

While the basic page orientation options are simple to use, Word offers more sophisticated ways to control the layout of your documents. This allows for a more flexible and creative approach to presenting your content.
Using Page Breaks to Control Orientation Changes
Page breaks are essential for managing orientation changes within a document. They allow you to define specific sections with different orientations, ensuring seamless transitions between portrait and landscape pages. This is particularly useful when you need to incorporate large tables, images, or charts that require a wider layout.
- Insert Page Breaks:To insert a page break, go to the “Insert” tab and click “Page Break”. This creates a new page, allowing you to apply different orientation settings for the following content.
- Apply Orientation Settings:After inserting a page break, select the content you want to change the orientation for. Go to the “Page Layout” tab, click “Orientation”, and choose either “Portrait” or “Landscape”.
Using the “Page Setup” Dialog Box for Fine-Tuning Orientation Settings, Change page orientation microsoft word
The “Page Setup” dialog box provides comprehensive control over page orientation and other layout settings. It allows you to apply specific orientation settings for different sections of your document, manage margins, and adjust paper size, among other options.
- Access the “Page Setup” Dialog Box:Go to the “Page Layout” tab and click the “Page Setup” button in the lower right corner of the “Page Setup” group. This will open the dialog box.
- Choose “Layout” Tab:In the “Page Setup” dialog box, select the “Layout” tab. Here, you’ll find options for controlling page orientation, margins, paper size, and more.
- Adjust Orientation Settings:Under the “Orientation” section, select either “Portrait” or “Landscape”. You can also choose “Apply to:” to specify the range of pages or sections where these settings should be applied.
- Preview Changes:The “Page Setup” dialog box also provides a preview window, allowing you to visualize the changes you’ve made before applying them to your document.
Limitations and Considerations When Working with Page Orientation
While Word provides extensive control over page orientation, there are a few limitations and considerations to keep in mind:
- Compatibility:Be aware that page orientation settings might not be fully preserved when sharing your document with others who may be using different versions of Word or other word processing software.
- Print Settings:Ensure your printer settings match the orientation specified in your document to avoid unexpected print results. Check your printer settings before printing to confirm that the orientation is correct.
- Content Flow:Consider how content flows between different orientation sections. Ensure that headings, text, and images align properly across page breaks and transitions.
Optimizing Page Orientation for Print and Digital
Page orientation is a crucial aspect of document design, significantly impacting readability, visual appeal, and the overall effectiveness of your content. Choosing the right orientation – portrait or landscape – can make a world of difference in how your document is perceived and consumed, whether it’s printed or viewed digitally.
Orientation Choices for Different Document Types
The optimal page orientation varies depending on the type of document you’re creating. Here’s a breakdown of the best orientation choices for common document types:
| Document Type | Best Orientation | Reason |
|---|---|---|
| Letters | Portrait | Standard format, easy to read and print on standard paper sizes. |
| Reports | Portrait | Typically long and detailed, portrait orientation provides more vertical space for text and tables. |
| Presentations | Landscape | Allows for wider slides, better suited for displaying visuals and data in a more impactful way. |
| Brochures | Landscape | Offers more space for images and text, creating a more visually engaging layout. |
| Resumes | Portrait | Standard format, ensures your resume fits on a single page. |
| Invoices | Portrait | Standard format, easy to read and print on standard paper sizes. |
Impact of Orientation on Readability
Page orientation directly affects how easily your document can be read, both in print and digital formats.
| Orientation | Print Readability | Digital Readability |
|---|---|---|
| Portrait | Ideal for long documents, as it allows for more text to be displayed on a single page, minimizing page turning. | Generally preferred for long documents, as it requires less scrolling, making it easier to read on smaller screens. |
| Landscape | Suitable for documents with visuals, tables, or charts, as it provides more horizontal space for wider layouts. | Can be challenging for long documents, as it may require excessive scrolling, potentially affecting user experience. |
Orientation and Margins/Page Size
Orientation plays a role in how you use margins and page size to achieve a balanced and visually appealing layout.