
Apply COUNTIF Logic in Power BI: Unleash Data Analysis Power
Apply countif logic power bi – Apply COUNTIF logic in Power BI: Unlock the power of counting specific values in your data. This versatile function, a cornerstone of data analysis, lets you easily count occurrences of specific values within columns. It’s like having a magnifying glass for your data, revealing hidden patterns and insights that might otherwise go unnoticed.
This blog post dives deep into the world of COUNTIF in Power BI, exploring its core functionality, implementation, and practical applications. We’ll guide you through using COUNTIF in DAX, demonstrating how to leverage its power to create insightful reports and visualizations.
Understanding COUNTIF Logic in Power BI

Power BI’s COUNTIF function is a powerful tool for analyzing data by counting occurrences of specific values within a column. It operates similarly to the COUNTIF function in Excel, offering a convenient way to quickly understand the distribution of data within your datasets.
Counting specific items in Power BI using the COUNTIF function is incredibly useful for analyzing data, just like figuring out how many stitches you need for a beautiful floral embroidered top DIY project. Similarly, COUNTIF lets you filter and count data based on specific criteria, helping you understand patterns and trends within your data.
Counting Specific Values within a Column
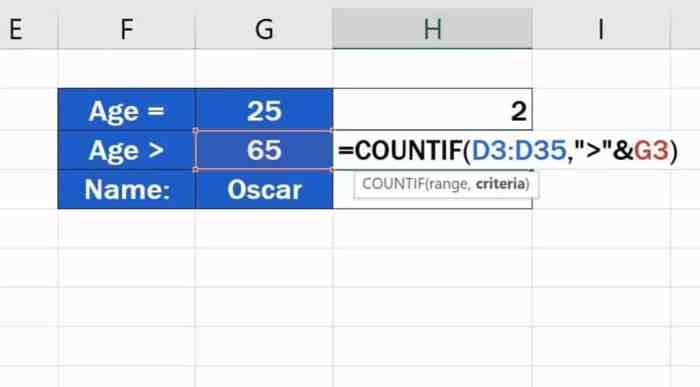
The COUNTIF function is primarily used to count the number of cells that meet a specific criterion within a column. It takes two arguments:* The range of cells to evaluate:This is the column where you want to count occurrences.
The criteria to match
This is the specific value or condition you want to count.Here’s an example of how COUNTIF works:Let’s say you have a column named “Product Category” containing different product categories like “Electronics,” “Clothing,” and “Books.” To count the number of “Electronics” products, you would use the following COUNTIF formula:
COUNTIF(Table1[Product Category], “Electronics”)
This formula will return the total number of cells in the “Product Category” column that contain the value “Electronics.”You can also use COUNTIF to count occurrences based on various conditions, such as:* Counting values greater than a specific number:
COUNTIF(Table1[Sales], “>100”)
This formula will count the number of sales values greater than 100.* Counting values containing a specific text:
COUNTIF(Table1[Customer Name], “*Smith*”)
This formula will count the number of customer names that contain the word “Smith.”COUNTIF offers a versatile approach to analyzing data in Power BI. It simplifies the process of understanding data distributions and identifying specific patterns within your datasets.
Implementing COUNTIF in Power BI DAX: Apply Countif Logic Power Bi
Power BI’s DAX language doesn’t have a direct equivalent to Excel’s COUNTIF function. However, you can achieve similar functionality using a combination of DAX functions like CALCULATE, FILTER, and COUNTROWS. This approach allows you to apply conditions and count rows based on specific criteria, mirroring the behavior of COUNTIF in Excel.
Using COUNTIF Logic in Calculated Columns
Calculated columns are used to add new columns to your Power BI tables based on existing data. You can implement COUNTIF logic within these columns to count occurrences based on certain criteria.To implement COUNTIF logic within calculated columns, follow these steps:
- Create a new calculated column.
- Use the CALCULATE function to apply a filter expression.The FILTER function is used to define the criteria for counting.
- Apply the COUNTROWS function to count the filtered rows.This will give you the count based on the specified criteria.
Here’s an example of a calculated column named “Count of Orders” that counts the number of orders for each customer:
Count of Orders = CALCULATE(COUNTROWS(‘Orders’), FILTER(‘Orders’, ‘Orders'[CustomerID] = [CustomerID]))
In this example:
- ‘Orders’is the name of the table containing the order data.
- ‘Orders'[CustomerID]represents the column containing customer IDs in the ‘Orders’ table.
- [CustomerID]refers to the current customer ID in the row where the calculated column is being applied.
This calculated column will count the number of orders for each customer based on the specified criteria.
Using COUNTIF Logic in Measures
Measures are dynamic calculations that are calculated on the fly based on the current context. You can use measures to implement COUNTIF logic to count rows based on conditions, similar to calculated columns.To implement COUNTIF logic within measures, follow these steps:
- Create a new measure.
- Use the CALCULATE function to apply a filter expression.This filter expression defines the criteria for counting.
- Apply the COUNTROWS function to count the filtered rows.This will give you the count based on the specified criteria.
Here’s an example of a measure named “Total Orders” that counts the total number of orders placed on a specific date:
Total Orders = CALCULATE(COUNTROWS(‘Orders’), FILTER(‘Orders’, ‘Orders'[OrderDate] = SELECTEDVALUE(‘Date'[Date])))
In this example:
- ‘Orders’is the name of the table containing the order data.
- ‘Orders'[OrderDate]represents the column containing order dates in the ‘Orders’ table.
- SELECTEDVALUE(‘Date'[Date])retrieves the selected date from the ‘Date’ table.
This measure will count the total number of orders placed on the currently selected date.
Understanding Filter Expressions in COUNTIF Logic
Filter expressions are crucial in implementing COUNTIF logic in Power BI. They define the conditions that determine which rows are counted. Filter expressions can be simple or complex, depending on the specific criteria you want to apply.Here are some common examples of filter expressions used in COUNTIF logic:
Filtering based on a single column
“` FILTER(‘Orders’, ‘Orders'[CustomerID] = “C001”) “` This filter expression will count the number of orders for customer ID “C001”.
Filtering based on multiple columns
“` FILTER(‘Orders’, ‘Orders'[CustomerID] = “C001” && ‘Orders'[OrderDate] = DATE(2023, 03, 15)) “` This filter expression will count the number of orders for customer ID “C001” placed on March 15, 2023.
Filtering based on a condition
“` FILTER(‘Orders’, ‘Orders'[OrderAmount] > 1000) “` This filter expression will count the number of orders where the order amount is greater than $1000.By understanding filter expressions, you can effectively apply COUNTIF logic to count rows based on various criteria, enabling you to analyze your data in Power BI.
Practical Applications of COUNTIF
COUNTIF is a versatile function that offers numerous applications beyond basic counting. Let’s explore some practical scenarios where COUNTIF can be leveraged to gain valuable insights from your data.
Applying COUNTIF logic in Power BI can be a powerful tool for analyzing data and creating insightful visualizations. Sometimes, though, I find myself craving a break from the screen and wanting to create something tangible. That’s when I turn to projects like recreate a spa like feel with this bedroom refresh and shibori style diy , which combine creativity and relaxation.
After a calming DIY session, I return to my Power BI work with a fresh perspective and a renewed sense of focus, ready to tackle even the most complex COUNTIF formulas.
Analyzing Customer Demographics, Apply countif logic power bi
COUNTIF can be used to analyze customer demographics within a Power BI report, providing insights into customer segmentation and targeted marketing strategies.Imagine a scenario where you have a dataset containing customer information, including age, gender, location, and purchase history. You can use COUNTIF to determine the number of customers in specific age groups, genders, or locations.For example, you can create a table that displays the count of customers in different age groups, such as 18-25, 26-35, 36-45, and so on.
This information can help you identify the most prominent customer segments and tailor your marketing campaigns accordingly.To achieve this, you would use the following DAX formula:
COUNTIF(Customers[Age], “>=”&18 && “<"&25)
Applying COUNTIF logic in Power BI is a powerful way to analyze data, but sometimes you need to look beyond your own projects for inspiration. Just like how Innersloth Games funded OuterSloth innersloth games fund outersloth , it’s essential to see how others are innovating.
This can spark new ideas and help you find creative solutions for your COUNTIF formulas in Power BI.
This formula counts the number of customers whose age falls between 18 and 25 (exclusive of 25). You can modify the formula to include other age groups or demographic criteria.
Counting Specific Product Categories
COUNTIF can be used to count the occurrences of specific product categories within a dataset, providing insights into product popularity and inventory management.Imagine a dataset containing product information, including product category, sales volume, and revenue. You can use COUNTIF to determine the number of products belonging to specific categories, such as electronics, clothing, or furniture.For example, you can create a table that displays the count of products in each category.
This information can help you identify the most popular categories and allocate resources accordingly.To achieve this, you would use the following DAX formula:
COUNTIF(Products[Category], “Electronics”)
This formula counts the number of products whose category is “Electronics”. You can modify the formula to include other product categories.
Tracking Sales Trends Over Time
COUNTIF can be used to track sales trends over time, providing insights into seasonal patterns and sales performance.Imagine a dataset containing sales information, including date, product category, and sales volume. You can use COUNTIF to determine the number of sales in specific time periods, such as months, quarters, or years.For example, you can create a line chart that displays the count of sales over time.
This information can help you identify peak sales periods, seasonal fluctuations, and trends in sales performance.To achieve this, you would use the following DAX formula:
COUNTIF(Sales[Date], “>=”&DATE(2023, 1, 1) && “<"&DATE(2023, 2, 1))
This formula counts the number of sales that occurred in January 2023. You can modify the formula to include other time periods or specific product categories.
COUNTIF and Conditional Logic
The COUNTIF function in Power BI, while powerful on its own, becomes even more versatile when combined with other DAX functions. This opens up possibilities for complex calculations and advanced filtering, allowing you to analyze data in nuanced ways. Let’s explore how to leverage COUNTIF with other DAX functions for richer insights.
Combining COUNTIF with Other DAX Functions
Combining COUNTIF with other DAX functions enhances its capabilities, allowing for more intricate data analysis. For example, you can use COUNTIF in conjunction with SUMX, CALCULATE, or FILTER to perform conditional aggregation, calculate weighted averages, or apply dynamic filters.Here are some common combinations and their applications:
- COUNTIF with SUMX:This combination enables you to calculate the sum of values based on a specific condition. For instance, you could calculate the total sales of products that meet a particular price range using SUMX and COUNTIF.
SUMX (‘Table’, IF ( COUNTIF ( ‘Table'[Product Category], ‘Table'[Product Category] ) > 1, ‘Table'[Sales], 0 ) )
This formula sums the ‘Sales’ column for each product category only if there are multiple products in that category.
- COUNTIF with CALCULATE:This combination allows you to apply COUNTIF within a context defined by CALCULATE. This is useful for calculating conditional counts within specific filter contexts. For example, you can count the number of orders placed in a particular month that meet a specific order value criteria.
CALCULATE (COUNTIF ( ‘Orders'[Order Date], ‘Orders'[Order Date] ), FILTER ( ‘Orders’, ‘Orders'[Order Value] > 1000 ) )
This formula calculates the number of orders placed in a specific month with an order value greater than 1000.
- COUNTIF with FILTER:This combination allows you to filter a table based on a specific condition and then apply COUNTIF to the filtered table. This is useful for counting occurrences within a specific subset of data. For example, you can count the number of customers in a particular region who have made more than three purchases.
COUNTIF (FILTER ( ‘Customers’, ‘Customers'[Region] = “North America” ), ‘Customers'[Number of Purchases] > 3 )
This formula counts the number of customers in the “North America” region who have made more than three purchases.
Nested COUNTIF Functions
Nested COUNTIF functions allow for advanced filtering by applying multiple conditions within a single formula. This technique can be used to identify specific data points that meet a combination of criteria.For example, imagine you have a table of sales data with columns for ‘Region’, ‘Product Category’, and ‘Sales Amount’.
You want to count the number of sales that meet the following criteria:* The sales amount is greater than $1000
- The product category is ‘Electronics’
- The region is ‘North America’
You can achieve this with a nested COUNTIF function:
COUNTIF ( FILTER ( ‘Sales’, ‘Sales'[Sales Amount] > 1000 && ‘Sales'[Product Category] = “Electronics” ), ‘Sales'[Region] = “North America”)
This formula first filters the ‘Sales’ table to include only rows where the ‘Sales Amount’ is greater than $1000 and the ‘Product Category’ is ‘Electronics’. Then, it applies COUNTIF to count the number of rows in this filtered table where the ‘Region’ is ‘North America’.
Creating a Custom Measure with COUNTIF
Custom measures provide a flexible way to perform calculations that are not readily available as built-in functions. You can create a custom measure that uses COUNTIF to perform conditional aggregation.For example, you can create a measure that calculates the number of orders placed in a specific month that meet a specific order value criteria.
Order Count by Value = CALCULATE ( COUNTIF ( ‘Orders'[Order Date], ‘Orders'[Order Date] ), FILTER ( ‘Orders’, ‘Orders'[Order Value] > 1000 ))
This measure uses COUNTIF to count the number of orders placed in a specific month, but it filters the data to only include orders with an order value greater than 1000. This measure can then be used in visualizations to analyze order trends based on value criteria.
COUNTIF and Data Visualization
COUNTIF, a powerful DAX function, can be leveraged to create insightful data visualizations in Power BI. By counting occurrences of specific values, COUNTIF enables us to understand data patterns and trends, which can be effectively represented using various charts and dashboards.
Visualizing Data Frequency with COUNTIF
COUNTIF can be effectively utilized to visualize the frequency of different values within a dataset. For instance, if you have a dataset containing customer purchase data, you can use COUNTIF to determine the frequency of purchases for each product category.
This information can be represented in a bar chart, where each bar represents a product category, and the height of the bar indicates the number of purchases made in that category.
The COUNTIF function can be used in conjunction with the DAX formula for creating a bar chart in Power BI:“`Product Category Count = CALCULATE(COUNTROWS(‘Sales’), FILTER(‘Sales’, ‘Sales'[Category] = “Electronics”))“`This formula calculates the number of rows in the ‘Sales’ table where the ‘Category’ column is equal to “Electronics.” This result can then be used to create a bar chart visualizing the frequency of “Electronics” purchases.
Integrating COUNTIF with Power BI Visualizations
COUNTIF can be seamlessly integrated with various Power BI visualizations to enhance data exploration and analysis.
- Bar Charts:Bar charts are ideal for displaying the frequency of different values, particularly when comparing categories. Using COUNTIF to determine the count for each category allows for creating a visually appealing and informative bar chart.
- Pie Charts:Pie charts are useful for visualizing the proportion of different values within a dataset. COUNTIF can be used to calculate the percentage of each value, which can then be represented in a pie chart.
- Line Charts:Line charts are suitable for visualizing trends over time. By using COUNTIF to count occurrences of a specific value within different time periods, we can create a line chart that shows the evolution of that value over time.
- Card Visuals:Card visuals can be used to display key metrics, such as the total count of a specific value. COUNTIF can be used to calculate this total count, which can then be displayed in a card visual.
Dashboarding with COUNTIF
COUNTIF plays a crucial role in creating insightful dashboards that highlight key insights from the data.
- Identifying Top Performers:By using COUNTIF to count the occurrences of specific values, such as sales representatives or products, we can identify the top performers in the dataset. This information can be displayed on a dashboard using card visuals or bar charts, providing a quick overview of the most successful elements.
- Monitoring Key Metrics:COUNTIF can be used to monitor key metrics, such as the number of customer complaints or the frequency of website visits. These metrics can be displayed on a dashboard using card visuals, providing a real-time view of the current performance.
- Trend Analysis:By using COUNTIF to count occurrences of values over different time periods, we can create a dashboard that displays trends in key metrics. This can help identify patterns and anomalies, allowing for proactive decision-making.