
QuickBooks Accounting Software Comparison: Finding the Right Fit
QuickBooks accounting software comparison sets the stage for this enthralling narrative, offering readers a glimpse into a story that is rich in detail and brimming with originality from the outset. Choosing the right accounting software can be a daunting task, especially when faced with a plethora of options.
This guide delves into the world of QuickBooks, exploring its features, functionality, and comparing it to other popular accounting software solutions. Whether you’re a small business owner or a seasoned accountant, understanding the nuances of QuickBooks and its alternatives is crucial for making an informed decision.
From basic accounting tasks to advanced inventory management and payroll features, QuickBooks offers a comprehensive suite of tools to streamline your financial operations. We’ll explore the key differences between QuickBooks Online and QuickBooks Desktop, highlighting their strengths and weaknesses.
Additionally, we’ll delve into the world of QuickBooks integrations and add-ons, showcasing how they can enhance your accounting experience.
Introduction to QuickBooks Accounting Software

QuickBooks is a popular accounting software designed to help small and medium-sized businesses manage their finances effectively. It offers a range of features that streamline accounting processes, making it easier for businesses to track income, expenses, and inventory, generate financial reports, and manage customer and vendor relationships.QuickBooks simplifies complex accounting tasks, enabling businesses to focus on core operations.
Versions of QuickBooks
The different versions of QuickBooks cater to the specific needs of various businesses. Here’s a breakdown of the key QuickBooks versions:
- QuickBooks Self-Employed: This version is ideal for sole proprietorships and freelancers who need to track income and expenses, file taxes, and manage mileage.
- QuickBooks Online: This cloud-based version offers real-time access to financial data from any device with an internet connection. It’s suitable for businesses of all sizes and provides features like online invoicing, bank reconciliation, and expense tracking.
- QuickBooks Desktop: This traditional desktop version is installed on a computer and offers advanced features like inventory management, job costing, and payroll. It’s suitable for businesses that prefer a local installation and require more robust functionality.
- QuickBooks Enterprise: This version is designed for larger businesses with complex needs. It offers advanced features like multi-user access, advanced reporting, and customizability.
Industries Where QuickBooks Is Commonly Used, Quickbooks accounting software comparison
QuickBooks is widely used across various industries, including:
- Retail: Businesses in the retail sector can use QuickBooks to track sales, manage inventory, and generate reports on customer spending patterns.
- Services: Service-based businesses, such as consulting firms, can utilize QuickBooks to track invoices, manage expenses, and generate reports on profitability.
- Manufacturing: QuickBooks helps manufacturers track production costs, manage inventory, and generate reports on production efficiency.
- Construction: Construction companies can use QuickBooks to manage project budgets, track expenses, and generate reports on project profitability.
- Non-profit Organizations: Non-profits can leverage QuickBooks to track donations, manage expenses, and generate reports on financial performance.
Key Features and Functionality: Quickbooks Accounting Software Comparison

QuickBooks offers a comprehensive suite of accounting features designed to streamline financial management for businesses of all sizes. These features include invoicing, expense tracking, reporting, and more. The specific features available vary depending on the QuickBooks version you choose.
Invoicing
QuickBooks simplifies the invoicing process, allowing businesses to create professional invoices, track payments, and manage outstanding balances.
- Invoice Creation:QuickBooks provides templates for creating invoices, allowing users to customize them with their company logo, contact information, and payment terms. Users can also add line items, discounts, and taxes to invoices.
- Payment Tracking:QuickBooks tracks payments received and allows users to view payment history. It also offers features for sending payment reminders and managing overdue invoices.
- Online Payments:QuickBooks integrates with payment gateways, enabling businesses to accept online payments directly through invoices. This feature can streamline the payment process and reduce the risk of late payments.
Expense Tracking
QuickBooks offers robust expense tracking capabilities, helping businesses monitor spending and maintain accurate financial records.
- Expense Categorization:QuickBooks allows users to categorize expenses, providing valuable insights into spending patterns. Users can create custom expense categories to suit their specific business needs.
- Expense Reporting:QuickBooks generates comprehensive expense reports, providing businesses with a detailed overview of their spending. These reports can be customized to display specific information, such as expenses by category, date range, or vendor.
- Receipt Management:QuickBooks enables users to scan and upload receipts, creating a digital record of expenses. This feature simplifies expense tracking and eliminates the need for physical receipt storage.
Reporting
QuickBooks provides a variety of financial reports, offering businesses valuable insights into their performance.
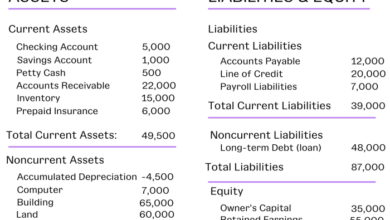
- Balance Sheet:This report summarizes a company’s assets, liabilities, and equity at a specific point in time.
- Income Statement:This report displays a company’s revenue and expenses over a specific period, providing insights into profitability.
- Cash Flow Statement:This report tracks the movement of cash into and out of a business, revealing its liquidity and ability to meet financial obligations.
Inventory Management
QuickBooks offers inventory management capabilities that vary depending on the version chosen.
- QuickBooks Self-Employed and QuickBooks Online Simple Start:These versions lack dedicated inventory management features.
- QuickBooks Online Essentials and Plus:These versions provide basic inventory management features, allowing users to track inventory levels, cost of goods sold (COGS), and reorder points.
- QuickBooks Online Advanced:This version offers advanced inventory management capabilities, including lot tracking, serial number tracking, and advanced reporting.
- QuickBooks Desktop Pro, Premier, and Enterprise:These versions offer the most comprehensive inventory management features, including advanced reporting, barcoding, and integration with third-party inventory management software.
Payroll and Tax Features
QuickBooks provides payroll and tax features to simplify payroll processing and tax compliance.
- Payroll Processing:QuickBooks allows businesses to calculate payroll, pay employees, and file payroll taxes. It also offers features for managing employee information, tracking time and attendance, and generating pay stubs.
- Tax Filing:QuickBooks integrates with tax agencies, allowing businesses to file payroll taxes electronically. It also provides tools for managing tax payments and generating tax reports.
- Tax Compliance:QuickBooks helps businesses stay compliant with tax regulations by providing up-to-date tax information and tools for managing tax liabilities.
Choosing the right QuickBooks accounting software can be a daunting task, especially when considering factors like cost, features, and ease of use. But what happens if your data gets lost or corrupted? That’s where having confidence in your data recovery solution becomes crucial.
If you’re in the UK and need reliable data recovery, check out this informative article on data recovery confidence uk. With peace of mind about your data, you can focus on finding the QuickBooks software that best fits your business needs.
Choosing the right QuickBooks accounting software can feel like a daunting task, especially when you’re trying to navigate all the different features and pricing plans. But sometimes, the most unexpected discoveries can help you make a decision. Did you know that a vet recently found that an Apple Watch can track not only human heart rates but also those of animals?
This discovery is a great reminder that even the most familiar tools can have surprising capabilities. Just like the Apple Watch, the right QuickBooks software can offer features you never even knew you needed to help your business thrive.
Choosing the right QuickBooks accounting software can feel like building a solid foundation for your business. Just like a well-built foundation, the right software will support your growth and help you navigate challenges. But, what happens when things go wrong?
For advice on getting the most out of your foundation and what to do when it breaks, check out this great resource: tips to get the most uses out of your foundation and what to do when it breaks.
Once you’ve got a solid foundation in place, you can confidently compare QuickBooks options to find the one that best suits your needs.