Mastering Professional Color Correction Techniques to Remove Yellow Tints and Achieve Precise White Balance in Digital Cinematography
The persistence of color inaccuracies in digital video production remains a significant hurdle for editors, particularly when white surfaces exhibit unintended yellow or orange tints due to improper in-camera white balance settings. These chromatic aberrations, often the result of mismatched Kelvin settings or fluctuating ambient light conditions, can undermine the perceived quality of a production. While global adjustments to color temperature are a standard first step, they often fail to address specific localized tints without introducing secondary color shifts. Industry professionals are increasingly turning to targeted saturation adjustments within the Hue versus Saturation (Hue vs Sat) curves to isolate and neutralize these problematic yellow casts, ensuring a "clean" white aesthetic that maintains the integrity of the surrounding color palette.
The Technical Foundation of Color Inaccuracy
To understand the necessity of surgical color correction, one must first examine the mechanics of white balance. In digital imaging, white balance is the process of removing unrealistic color casts, so that objects which appear white in person are rendered white in your photo or video. Proper camera white balance takes into account the "color temperature" of a light source, which refers to the relative warmth or coolness of white light.
Light is measured on the Kelvin scale. For instance, a candle flame registers at approximately 1,850K (very warm/orange), while a clear blue sky can exceed 10,000K (very cool/blue). If a camera is set to a daylight preset (5,600K) but the scene is illuminated by tungsten or warm LED lighting (3,200K), the resulting footage will inevitably lean toward the yellow and orange spectrum. In professional environments, this is mitigated by using gray cards or light meters on set. However, in documentary, run-and-gun, or indie film scenarios, these errors frequently slip through to the post-production phase.

The problem with a "yellow tint" is that it often feels "muddy" rather than "warm." While a warm aesthetic might be a creative choice, an accidental yellow cast on a white shirt, a porcelain cup, or a white horse suggests a lack of technical oversight. Correcting this globally using a "Temperature" slider often introduces a blue tint to the shadows or mid-tones, creating a synthetic, unnatural look. This necessitates the use of more sophisticated tools like the Lumetri Color engine.
The Evolution of Post-Production Color Tools
The ability to perform high-level color grading within a Non-Linear Editor (NLE) like Adobe Premiere Pro is a relatively recent development in the history of cinema. Historically, color grading was a separate process involving chemical baths for film or expensive, dedicated hardware suites like DaVinci Resolve or the now-defunct SpeedGrade.
In 2015, Adobe integrated the Lumetri Color panel into Premiere Pro, effectively democratizing professional-grade color tools for the average content creator. This panel combined the technical precision of color science with the intuitive interface of photo editing software. Among its most powerful features are the "Curves," which allow editors to manipulate specific ranges of color without affecting the entire image. The Hue vs Sat curve, specifically, has become a staple for editors seeking to "clean" their whites by targeting the saturation of specific wavelengths of light.
A Chronological Guide to Targeted Yellow Removal
The process of neutralizing a yellow color cast involves a series of logical steps designed to isolate the problematic hue while protecting the rest of the image’s color data.

Step 1: Initial Assessment and Lumetri Application
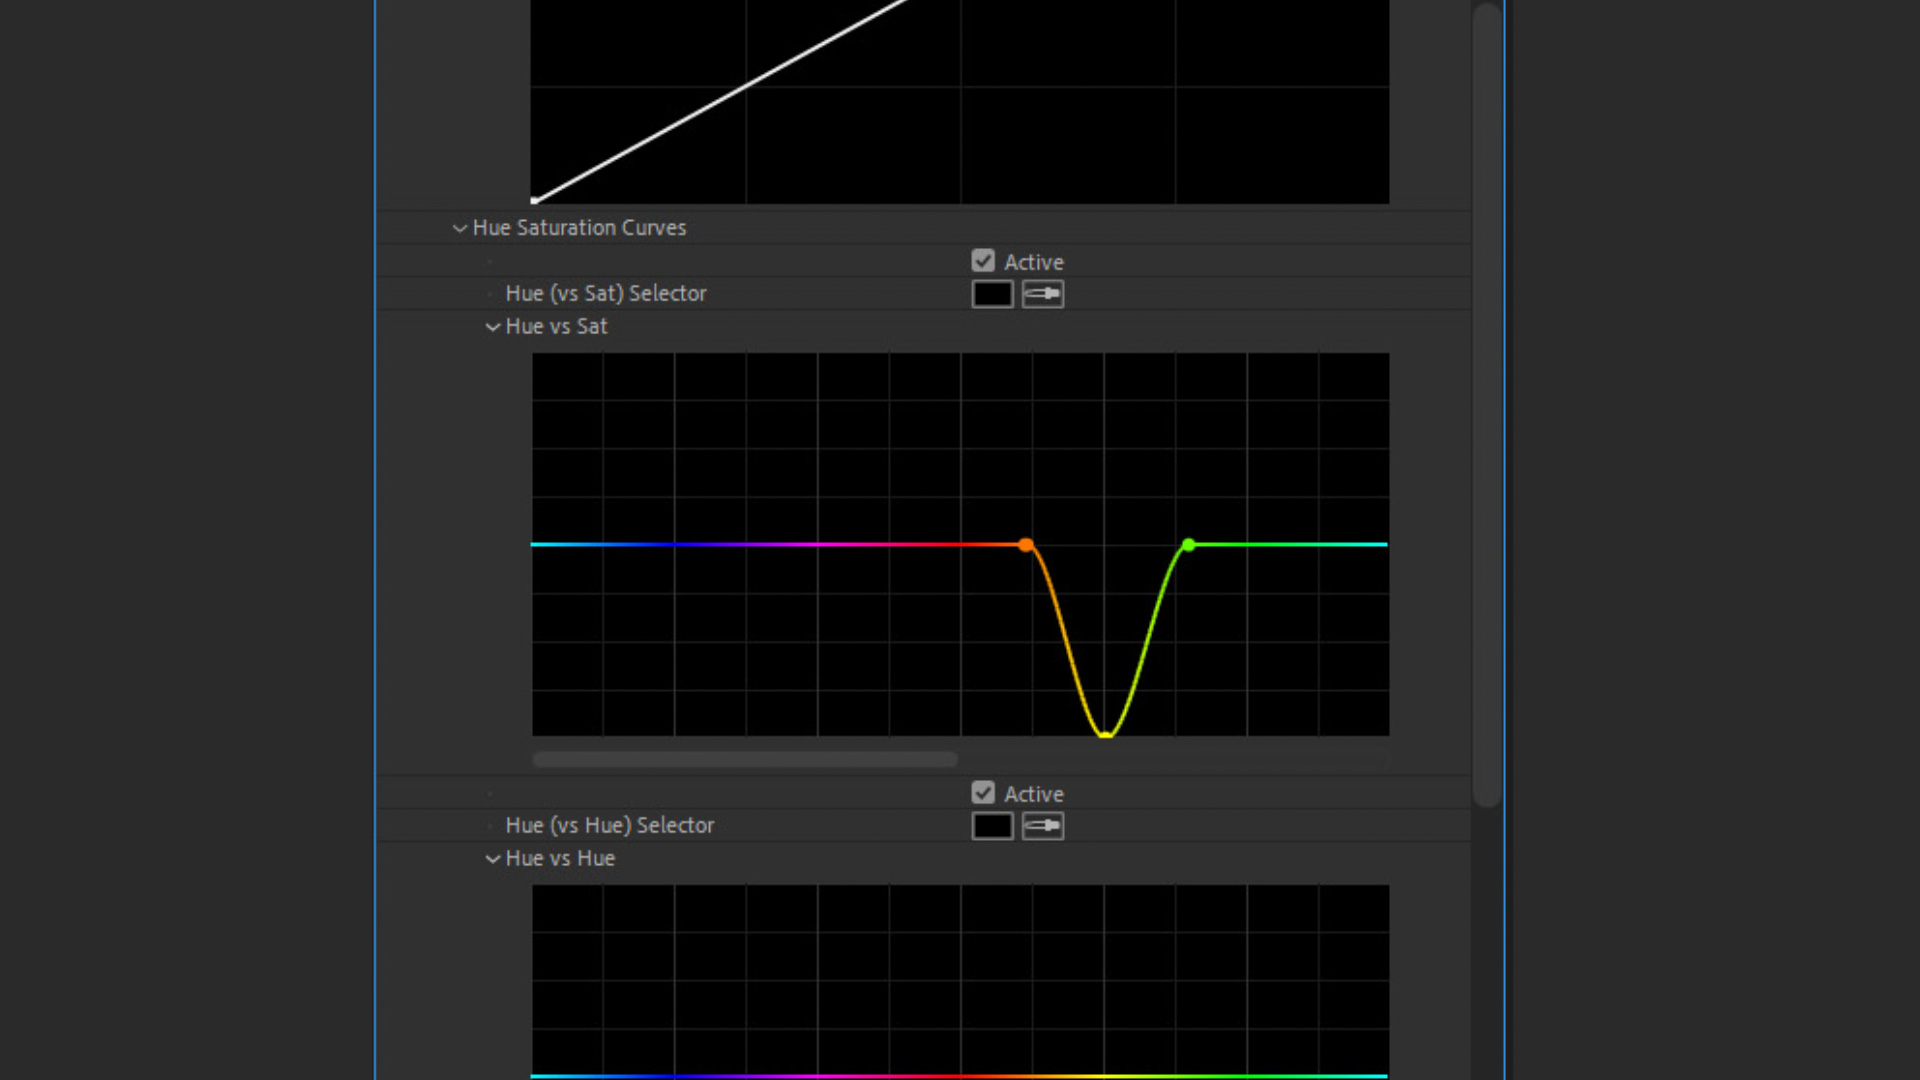
The editor begins by identifying the areas of the frame where the white balance has failed. Common indicators include "dingy" whites or skin tones that appear overly jaundiced. The Lumetri Color effect is then applied to the clip on the timeline. Within the effect controls, the user navigates to the "Curves" drop-down menu, specifically locating the "Hue vs Sat" curve. This curve is represented as a horizontal rainbow line, where the vertical axis represents saturation and the horizontal axis represents the hue.
Step 2: Strategic Point Placement
To isolate the yellow spectrum, the editor must create a "containment zone" on the curve. This is achieved by clicking on the line to create three distinct control points. The first point is placed in the Orange sector, the second in the Yellow sector, and the third in the Green sector. These points act as anchors. By placing points in the orange and green areas, the editor ensures that any adjustments made to the yellow point do not "bleed" into the reds or blues, thereby preserving skin tones and foliage.
Step 3: Saturation Reduction
With the three points established, the editor selects the middle point (the Yellow point) and drags it downward. This action reduces the saturation of only the yellow hues in the image. Depending on the severity of the tint, the point may be dragged halfway down for a subtle correction or all the way to the bottom for a complete desaturation of that specific hue.
The result is an immediate "whitening" of the areas that were previously tinted. Because the adjustment is targeted, the whites lose their yellow muddiness and return to a neutral state, while other colors—such as a blue sky or a red shirt—remain untouched.
Comparative Analysis: Global vs. Targeted Adjustments
Data from post-production houses suggests that targeted curve adjustments lead to higher client satisfaction and lower "revision" rates compared to global temperature shifts. In a global adjustment, the editor moves the entire color spectrum toward blue to counter the yellow. This often results in "cold" shadows, where the black areas of the image take on an unnatural blue tint.
In contrast, the Hue vs Sat method operates on the principle of subtractive correction. Instead of adding a compensating color (blue), it removes the offending color (yellow). This is particularly crucial in commercial videography—such as product shots of white electronics or medical equipment—where color accuracy is synonymous with brand integrity.
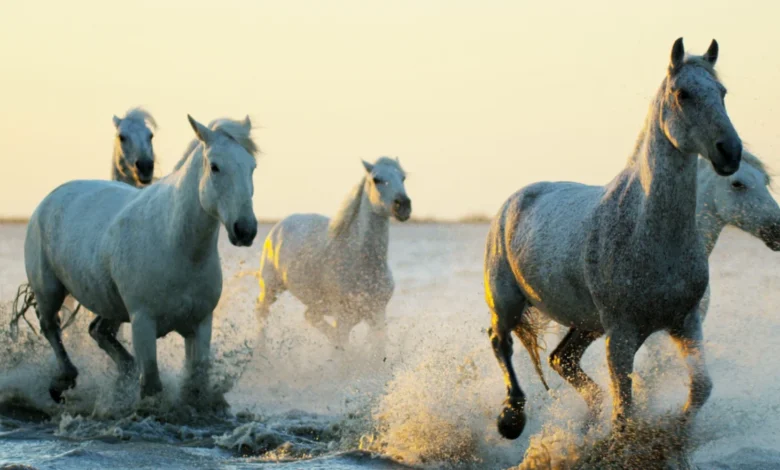
For example, in footage featuring white horses running on a beach at sunrise, a global temperature fix might turn the golden sand into a dull gray or make the ocean look unnaturally frozen. By using the Hue vs Sat curve, an editor can remove the orange/yellow cast from the horses’ coats while maintaining the warm, aesthetic glow of the sunrise in the background.
Industry Perspectives and Professional Standards
Colorists often argue that the "clean white" look is one of the most difficult to achieve but most essential for professional-grade output. According to technical directors at major streaming platforms, consistent white balance is one of the key metrics used to determine if a piece of content meets "broadcast quality" standards.

"The eye is incredibly sensitive to white balance," notes one senior colorist. "We know what white is supposed to look like. If it’s even five percent too yellow, the viewer’s brain registers the image as ‘dirty.’ Using curves to pull out that specific yellow saturation is the fastest way to polish a shot without destroying the creative intent of the lighting."
Furthermore, the rise of High Dynamic Range (HDR) and Rec. 2020 color gamuts has made these corrections even more vital. With a wider range of colors and higher peak brightness, inaccuracies in the yellow-orange spectrum become significantly more apparent to the viewer. Precision tools like Lumetri’s curves allow editors to meet these higher technical demands.
Broader Implications for the Media Landscape
The democratization of these techniques has profound implications for the media landscape. As the barrier to entry for high-quality video production continues to drop, the distinction between "amateur" and "professional" content is increasingly found in the nuance of the edit.
- The Rise of the "Prosumer": Small businesses and independent creators can now produce advertisements and films that rival the visual fidelity of major agencies by mastering these post-production "quick tips."
- Efficiency in Workflow: By utilizing targeted curve adjustments, editors can save hours that would otherwise be spent on complex masking or rotoscoping to fix color issues.
- Educational Integration: These methods are now being integrated into film school curricula worldwide, shifting the focus from "getting it perfect in the camera" to "understanding the symbiotic relationship between production and post-production."
While the ideal scenario remains capturing perfect white balance on set, the reality of modern production often requires a "fix it in post" approach. Tools like Lumetri Color and techniques like the Hue vs Sat yellow reduction provide a safety net for filmmakers.

Conclusion and Future Outlook
The transition from global color corrections to targeted, curve-based adjustments represents a significant maturation of the digital editing process. By isolating the yellow and orange hues that plague white surfaces, editors can achieve a level of clarity and "cleanliness" that was once reserved for high-end color suites.
As software continues to evolve, we may see AI-driven tools that automatically identify and neutralize these tints based on machine learning models of "true white." However, for the foreseeable future, the manual control offered by the Lumetri Color Hue vs Sat curve remains the gold standard for editors who demand total creative and technical control over their imagery. The ability to transform a "problematic" shot into a "professional" one with just three points on a curve is a testament to the power of modern digital cinematography tools. In an era where visual content is king, these technical nuances are what define the masters of the craft.


