Mastering the Mini DV Aesthetic: A Professional Guide to Recreating 90s Lo-Fi Video in After Effects


The relentless cycle of digital nostalgia has officially set its sights on a new era of vintage filmmaking, pushing the ubiquitous VHS aesthetic slightly aside to make room for the distinct look and feel of Mini DV footage. As modern creatives seek out tactile, authentic textures to contrast with the hyper-crisp, flawless output of modern 4K and 8K digital cinema cameras, the lo-fi charm of late 1990s and early 2000s consumer camcorders has experienced a massive resurgence. From high-fashion music videos and independent short films to viral social media content, the characteristic compression artifacts, color fringing, and jagged edges of Mini DV are capturing the imagination of a generation too young to have used the format firsthand. For video editors and motion designers looking to harness this trend without hunting down obsolete hardware and functional tape decks, industry professionals are turning to post-production solutions. Adobe After Effects remains one of the most powerful platforms for reverse-engineering these analog and early-digital imperfections. By manipulating composition dimensions, utilizing specific color-correction parameters, and applying targeted blur and sharpening filters, editors can faithfully replicate the authentic look of Mini DV tape within a modern digital workflow.
The Historical Context of the Mini DV Revolution
To understand why Mini DV has become the latest darling of the lo-fi movement, it is essential to examine its technological origins. Introduced in 1995 through a collaborative effort by major global electronics manufacturers including Panasonic, Sony, JVC, Philips, and Sharp, the Mini DV format revolutionized consumer and prosumer videography. For the first time, everyday filmmakers, documentarians, and families could capture digital video on a magnetic tape cassette that was a fraction of the size of traditional VHS or Hi8 tapes.
Unlike the purely analog signals of its predecessors, Mini DV recorded digital video using intraframe compression (DV codec) at a resolution of 720×480 for NTSC or 720×576 for PAL, mapped to a 4:3 aspect ratio. Despite being digital, the technology was heavily constrained by the hardware limitations of the era. CCD (Charge-Coupled Device) sensors in early camcorders were small and struggled in low-light conditions, leading to noticeable digital noise. Furthermore, the compression algorithms and interlaced scanning methods produced distinct visual artifacts that modern audiences now associate with authenticity, memory, and an unfiltered DIY aesthetic. As shooting on actual tape becomes increasingly impractical due to degrading media and the scarcity of working playback hardware, software-based emulation has become the industry standard for achieving this aesthetic.

Phase-by-Phase Technical Breakdown: Setting Up the Mini DV Composition
Recreating the physical limitations of a Mini DV camera in Adobe After Effects begins with manipulating resolution and pixel structure. The process relies on downscaling high-definition footage to force the software to interpolate pixels in a way that mimics the low-resolution sensor of a 90s camcorder before scaling it back up to fit modern high-definition display standards.
The workflow starts by creating a foundational pre-composition dedicated entirely to the source footage. Editors should establish a new composition, designated as the Mini DV Comp, and configure the dimensions to an ultra-low resolution of 200 pixels by 150 pixels. This specific frame size locks the project into a strict 4:3 aspect ratio, which is historically accurate to standard-definition consumer cameras of the era. Once the composition is established, the target video clip is imported and placed onto the timeline. Because the source footage is likely standard 1080p or 4K resolution, it will initially appear oversized. To correct this efficiently without manually guessing scale percentages, editors can navigate the drop-down menus by selecting Layer, moving to Transform, and choosing Fit to Comp Height. This action automatically scales the high-resolution asset down to fit the diminutive 150-pixel height constraint.
At this stage in the timeline, previewing the video will reveal extreme pixelation, rendering the image heavily blocky and indistinct. However, this degradation is a vital prerequisite for the next phase of the emulation process.
Scaling and Generating Authentic Aliasing Artifacts
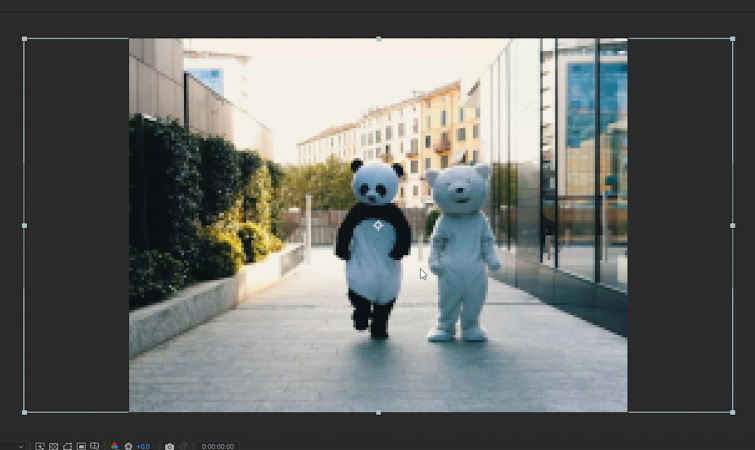
Once the low-resolution pre-composition is prepared, the next objective is to integrate it into a contemporary master delivery framework while retaining its degraded visual signature. This step introduces the aliasing and stair-stepping artifacts that are the hallmark of converted standard-definition digital video.
The editor must generate a second, primary composition—commonly named the Main Comp—configured to standard full-definition dimensions of 1920 pixels by 1080 pixels at a standard framerate. The previously created Mini DV Comp is then dragged and dropped directly into this Main Comp timeline. Because the low-resolution pre-comp is now sitting inside a massive 1080p workspace, it will appear tiny in the center of the frame. To resolve this, the editor selects the Mini DV Comp layer, returns to the transform settings via Layer, Transform, and once again applies the Fit to Comp Height command.
When the 200×150 composition is scaled up to fill a 1080p screen, After Effects stretches the limited pixel data, instantly generating severe aliasing. Viewers will immediately notice the distinct "stair-stepping" artifacting along horizontal lines, diagonal edges, and sharp geometric shapes within the frame. Additionally, high-contrast borders will exhibit a pronounced, buzzing flickering effect as the pixel grid struggles to resolve fine details. These imperfections, which video engineers once spent decades trying to eliminate from broadcast television, are precisely the aesthetic qualities that modern creators intentionally seek out for their nostalgic resonance.
Enhancing the Look: Color Grading for Harsh Contrast
Replicating the visual profile of a Mini DV tape requires more than just resolution manipulation; it demands a specific color and tonal response that reflects the digital processing limitations of 1990s sensor technology. Consumer-grade camcorders from that era lacked the wide dynamic range and sophisticated color science found in modern digital cinema packages, often resulting in muddy shadows, blown-out highlights, and aggressive contrast profiles.

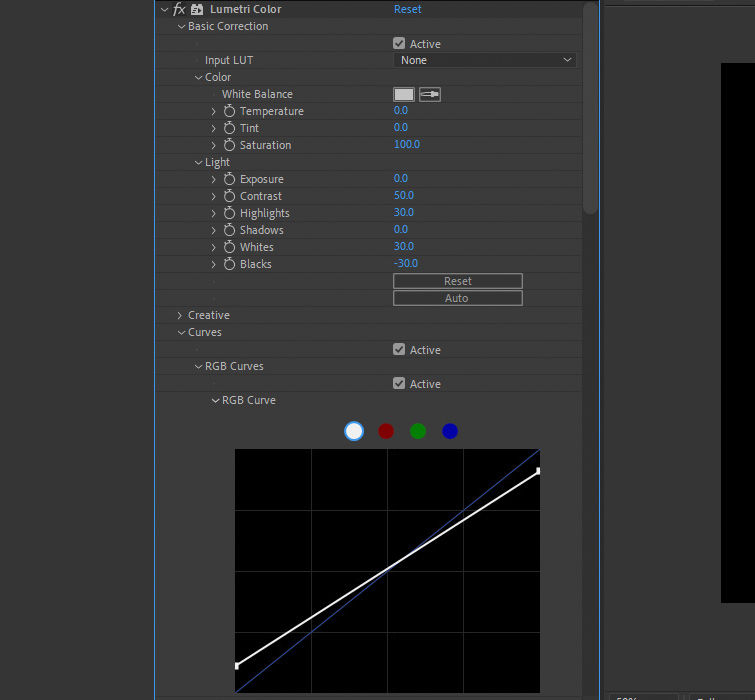
To achieve this, creators apply the industry-standard Lumetri Color effect directly to the Mini DV Comp layer within the Main Comp. The goal of this grading pass is to push the image away from a modern, flat, or log-profile look toward something decidedly harsh and unforgiving. Adjustments should begin by raising the overall Contrast setting to approximately 50 to force a harder separation between dark and light tonal regions. Next, the Highlights and Whites should both be increased by roughly 30 units to introduce a bright, digital clipping characteristic common in early consumer sensors. Conversely, the Blacks should be pulled down to -30 to crush shadow detail into deep, murky tones. For editors seeking granular control over these parameters, the RGB Curve tool can be utilized to manually pinch the White and Black points, tightening the dynamic range and cementing the archival video appearance.
Simulating Chromatic Aberration via Channel Blur
One of the subtle yet defining optical characteristics of footage shot on budget-friendly 90s lenses and processed through early consumer sensor chips is color fringing, or chromatic aberration. This optical defect occurs when a lens fails to focus all colors to the same convergence point, resulting in visible color halos—most frequently red, green, or blue—along high-contrast edges within the frame.
To replicate this physical phenomenon digitally without requiring third-party plugins, After Effects offers a built-in tool known as the Channel Blur effect. When applied to the Mini DV Comp layer, this effect allows editors to manipulate individual color channels independently of one another. To achieve the classic vintage color fringe, the editor targets the Blue Blurriness parameter and increases its value to 3. This slight separation offsets the blue color channel from the red and green channels, creating a soft, bleeding chromatic fringe that spreads across the frame. This subtle optical flaw tricks the human eye into perceiving the digital file as an analog-processed recording captured on physical magnetic tape, significantly enhancing the overall lo-fi illusion.
Finalizing the Polish with Unsharp Masking
The final technical step in the digital emulation pipeline involves accentuating the jagged edges and digital noise introduced during the downscaling and upscaling phases. While blurring certain channels creates color bleed, sharpening the overall luminance channel ensures that the video retains a punchy, aggressive texture rather than looking merely out of focus.
The Unsharp Mask effect is applied to the top of the effect stack on the Mini DV Comp layer. Originally designed in traditional photography to enhance edge definition by creating subtle light and dark halos along contrasting boundaries, the unsharp mask becomes a powerful stylistic tool in retro video processing. Editors should set the Amount parameter to 150 and the Radius parameter to 2. These values can be modulated up or down depending on the resolution and detail density of the source footage. By pushing the unsharp mask, the editor intensifies the aliasing artifacts and introduces a harsh, digital haloing effect around subjects, successfully locking in the authentic, unpolished texture of archival tape footage. Once these steps are complete, the workflow remains entirely non-destructive; editors can easily swap out the source footage inside the Mini DV Comp pre-composition at any time, instantly applying the entire retro processing pipeline to new video clips with zero repetition of effort.
Broader Industry Implications of the Lo-Fi Trend in Visual Media
The growing popularity of software-emulated retro aesthetics points to a broader cultural and economic shift within the commercial media landscape. As professional production equipment becomes increasingly accessible—allowing virtually any creator to shoot pristine, ultra-high-definition video on consumer devices—the visual language of perfection has lost its exclusive status as a marker of high production value. Imperfection has instead become a luxury, serving as a deliberate stylistic choice that signals authenticity, artistic intentionality, and emotional resonance.
Industry analysts note that this embrace of lo-fi formats reflects a psychological pushback against sterile digital environments. By introducing artificial artifacts, compression noise, and color degradation, creators are effectively humanizing their digital content, bridging the gap between polished commercial output and the intimate, home-video style of amateur archives. Whether applied to music videos, commercial advertising, or narrative cinema, techniques that simulate formats like Mini DV and VHS demonstrate that technology’s past will continually be recycled to shape its future aesthetic horizons.