Mastering White Balance Correction: A Professional Guide to Removing Unwanted Yellow and Orange Color Casts in Post-Production


Achieving accurate color representation in digital video production remains one of the most persistent challenges for editors and colorists. Among the most frequent visual anomalies encountered in raw footage is an unwanted yellow or orange color cast, which frequently compromises the integrity of white objects and neutral tones. This issue typically stems from incorrect in-camera white balance settings, unanticipated shifts in ambient lighting temperature, or mixed-lighting environments where natural sunlight and artificial tungsten sources collide. While traditional post-production workflows rely on basic temperature and tint sliders to neutralize these discrepancies, such global adjustments often yield unnatural skin tones or inadvertently shift the color profile of adjacent elements. To counter these limitations, advanced post-production techniques utilizing selective color curves have emerged as a superior method for isolating and neutralizing unwanted color casts without sacrificing the overall vibrancy of a scene.
The Technical Mechanics of Color Casting and White Balance

In digital cinematography, white balance is the process of globally removing unrealistic color casts so that objects which appear white in person are rendered white in the final recorded image. Sensors in digital cinema cameras and mirrorless devices capture light across the visible spectrum, relying on metadata or manual pre-sets to establish a baseline neutral gray point. However, when a camera is calibrated incorrectly—such as shooting under a low-kelvin indoor tungsten light source while set to a daylight balance of 5600K—the resulting footage absorbs an aggressive orange and yellow bias.
Historically, colorists attempted to rectify this by lowering the overall color temperature or introducing blues and cyans via primary correction wheels. While effective in controlled environments, this global approach frequently creates muddy midtones, desaturates healthy skin tones, and introduces digital noise in the blue channel. Industry standards have steadily shifted toward secondary color correction, allowing artists to target specific hues directly. By isolating the problem area within the color spectrum rather than applying a blanket adjustment, editors maintain precise control over luminance and chrominance values.
Step-by-Step Implementation Using Adobe Premiere Pro

To execute this selective correction efficiently, professional editors frequently turn to the Lumetri Color panel within Adobe Premiere Pro. The primary tool required for this workflow is the Hue vs Saturation (Hue vs Sat) curve, a powerful non-destructive grading utility that maps the entire color spectrum onto a linear, two-dimensional grid.
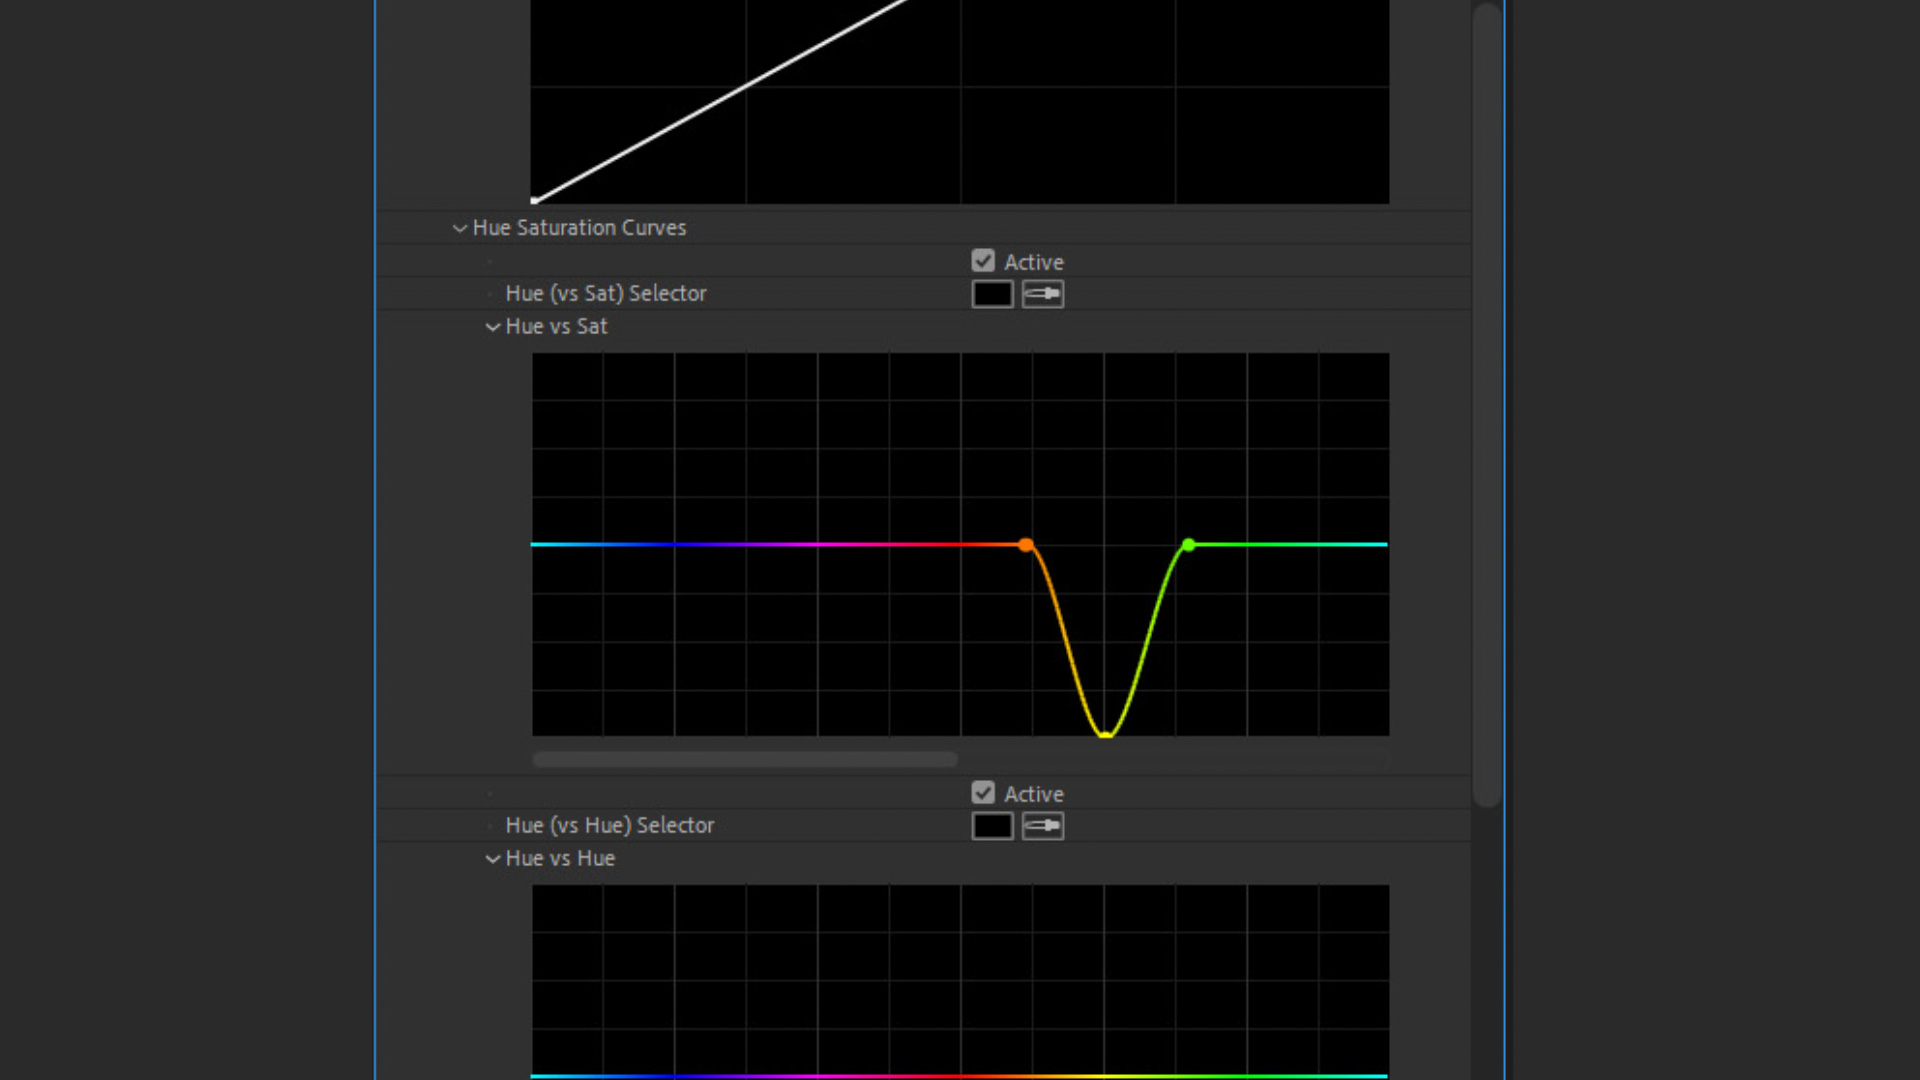
The procedure begins by applying the Lumetri Color effect to the targeted clip on the timeline. The operator then navigates to the Curves section and locates the Hue vs Sat graph, which visually represents a color wheel stretched across a horizontal axis, intersecting with saturation levels on the vertical axis. To isolate the problematic hues, the user must anchor the surrounding color spectrum by creating three distinct control points on the curve: one in the green spectrum, one in the yellow spectrum, and one in the orange spectrum. These anchor points act as administrative boundaries, ensuring that adjacent colors—such as natural foliage, clothing, or skin tones—remain completely unaffected by the adjustment.
Once the boundaries are established, the user selects the central point corresponding to the unwanted yellow or orange tint and drags it downward along the vertical axis. This action selectively diminishes the saturation of those precise wavelengths. Depending on the severity of the color cast in the original capture, the point can be dropped halfway for a subtle neutralization or pulled entirely to the bottom of the axis to completely strip out the heavy tint. The resulting image immediately displays cleaner, truer whites and restores a balanced visual hierarchy to the frame.
Case Studies in Practical Application
The efficacy of this targeted curve adjustment is best demonstrated across diverse shooting scenarios, ranging from controlled studio product videography to dynamic outdoor natural lighting conditions. In commercial studio settings—such as macro shots involving white powders, liquids, or laboratory equipment—even minor ambient light reflection can cast a sickly yellow hue over pristine surfaces. Traditional white balance adjustments often fail here because the background elements and the primary subject share identical luminance values. By utilizing the three-point Hue vs Sat method, editors can instantly strip the yellow contamination from the white components of the shot while preserving the rich, warm tones of surrounding contextual objects.
A secondary and equally demanding application involves exterior natural lighting, specifically during sunrise or sunset. Golden hour cinematography is prized for its warm, dramatic aesthetic; however, unmanaged lighting conditions can sometimes push white elements—such as coastal foam, architectural facades, or white-coated wildlife—into an unappealing, overly saturated orange territory. Attempting to cool down the entire clip via global temperature sliders ruins the authentic warmth of the setting sun. By selectively reining in the orange and yellow curves using the Lumetri workflow, an editor can retain the dramatic amber glow of the horizon while restoring natural, crisp whites to the subjects within the frame, thereby achieving a visually harmonious and professionally graded final product.

Industry Implications and Advanced Color Grading Paradigms
The adoption of targeted curve manipulations reflects a broader evolution in non-linear editing (NLE) software development. As client expectations for cinematic quality increase across both independent and commercial productions, the margin for error in post-production continues to shrink. Editors are no longer expected to simply assemble cuts; they must possess cross-disciplinary fluency in color science, audio mastering, and motion graphics.
Furthermore, the integration of these sophisticated tools into standard software suites democratizes high-end finishing techniques. Previously, isolating specific color vectors required complex node-based compositing or dedicated finishing suites like DaVinci Resolve. Today, standard NLE platforms empower individual creators to solve complex color contamination issues in a matter of seconds. This efficiency minimizes project turnaround times and reduces the financial overhead associated with reshooting footage or outsourcing specialized color correction services.

As post-production workflows continue to evolve with the incorporation of artificial intelligence and machine learning—such as automated color matching and neural-engine-based white balancing—manual mastery of fundamental tools like the Hue vs Sat curve remains indispensable. Automated systems frequently misinterpret artistic intent, neutralizing warm cinematic grades in an attempt to achieve neutral clinical gray points. Consequently, understanding how to manually isolate and neutralize color casts ensures that editors retain creative control, producing visually compelling narratives that align precisely with their artistic vision.