Mastering Audio and Sound Effects in Adobe After Effects: A Comprehensive Guide for Motion Designers

Adobe After Effects is widely recognized as the industry standard for motion graphics and visual effects, yet its audio capabilities are frequently relegated to a secondary status by novice users and seasoned professionals alike. Despite the software’s primary focus on visual manipulation, the integration of high-quality audio and precision sound design is essential for creating immersive digital content. In the modern production landscape, where sensory-rich media dominates platforms from cinema to social media, understanding the nuances of the After Effects audio engine is no longer optional for creators seeking to deliver professional-grade results.
The role of sound in motion design extends beyond mere accompaniment; it serves as the rhythmic backbone of animation. Industry data suggests that while high-quality visuals attract viewers, it is the auditory experience that ensures retention and emotional resonance. According to recent surveys in the post-production sector, approximately 70% of audience engagement in short-form marketing is driven by the synergy between sound effects (SFX) and visual transitions. Consequently, the ability to navigate After Effects’ audio tools—ranging from basic waveform visualization to complex keyframe conversions—is a critical skill set for any digital artist.

Technical Framework: The After Effects Audio Interface
To effectively manage sound within a visual-first environment, users must first master the specialized panels dedicated to audio monitoring. Unlike dedicated Digital Audio Workstations (DAWs) such as Adobe Audition or Logic Pro, After Effects utilizes a streamlined interface designed for synchronization rather than multi-track mixing.
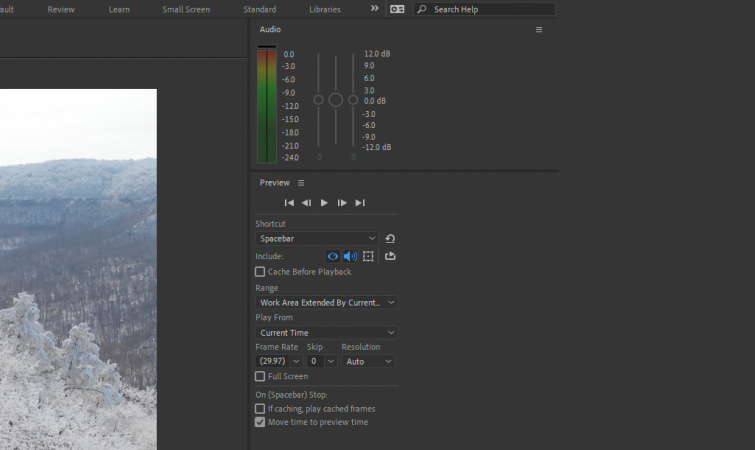
The Audio panel, accessible via the Window menu, serves as the primary visualizer for sound levels. It provides a decibel (dB) meter that allows editors to monitor peak levels and prevent digital clipping—a phenomenon where audio signals exceed the maximum limit, resulting in harsh distortion. For most digital delivery formats, maintaining peaks between -6dB and -12dB is considered an industry standard to ensure headroom for final mastering.
Complementing the Audio panel is the Preview panel. This component is vital for controlling how sound behaves during the design process. Within this panel, users can toggle audio playback on or off during previews. This functionality is particularly important when working on complex compositions where system resources are heavily taxed; disabling audio can sometimes lead to smoother visual playback during the initial layout phase.
A Chronology of Workflow: From Import to Synchronization
The process of integrating audio into an After Effects project follows a specific technical chronology designed to minimize latency and maximize precision.
- Importation and Layer Management: Audio files, typically in WAV or AIFF formats for lossless quality, are imported into the Project panel and then dragged into the Timeline. Once placed, the audio layer is represented by a speaker icon, which acts as a toggle for muting or enabling the track.
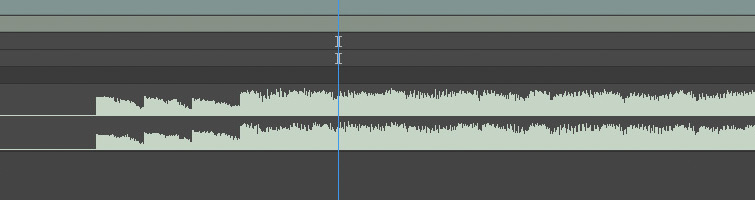
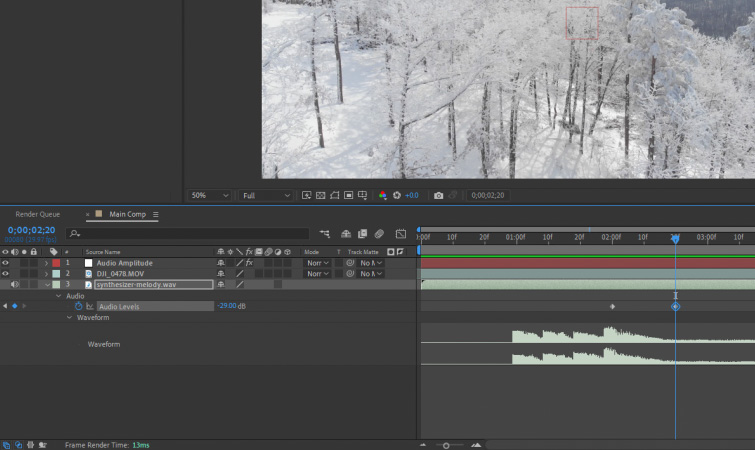
- Waveform Visualization: The most critical step for synchronization is the activation of the waveform. By selecting the audio layer and pressing the "L" key twice in rapid succession, the user expands the waveform display. This visual representation of sound pressure levels allows the designer to identify beats, percussive hits, and vocal pauses without relying on real-time playback.
- The Playback Strategy: Due to the intensive processing required for motion graphics, After Effects often struggles with real-time audio-visual sync. To mitigate this, professionals utilize the Numeric Keypad. Pressing "0" initiates a RAM Preview, which caches both frames and audio into the system’s memory for smooth playback. Alternatively, pressing the decimal point (.) on the numeric keypad triggers an "Audio Only" preview, allowing for quick checks of sound timing without the overhead of rendering visual frames.
The Latency Challenge: Editing by Sight vs. Sound
A significant hurdle in the After Effects environment is the inherent delay often associated with audio playback. Because the software prioritizes the rendering of complex visual layers, the auditory signal can occasionally drift or suffer from a slight lag during standard spacebar previews.
To counteract this, the professional consensus among motion designers is to "edit by sight." By utilizing the waveform as a topographical map of the audio track, editors can align keyframes for motion—such as a scale pop or a position shift—directly with the peaks in the waveform. This method ensures mathematical precision in synchronization, which remains consistent even if the playback engine experiences a temporary slowdown. This "waveform-first" approach is the hallmark of high-end commercial work, where a frame-accurate hit on a beat can be the difference between a jarring transition and a seamless flow.
Advanced Data Integration: Converting Audio to Keyframes
One of the most powerful features within After Effects is the ability to bridge the gap between auditory data and visual properties. Through the "Convert Audio to Keyframes" function, the software analyzes the amplitude of a sound file and generates a series of numerical values.
By right-clicking an audio layer and navigating to Keyframe Assistant > Convert Audio to Keyframes, the software generates a new Null Object named "Audio Amplitude." This layer contains sliders for the Left Channel, Right Channel, and Both Channels. These sliders hold keyframe data that fluctuates in direct proportion to the volume of the audio.
This data can then be linked to any visual property—such as the opacity of a light, the frequency of a wiggle expression, or the scale of an object—using the "Pick Whip" tool or expressions. For example, a designer can link the scale of a logo to the "Both Channels" slider, causing the logo to pulse in perfect synchronization with a bass drum. This automation of "visual music" is a staple in music video production and abstract motion design, allowing for levels of synchronization that would be impossible to achieve through manual keyframing.
The Built-in Audio Effects Suite
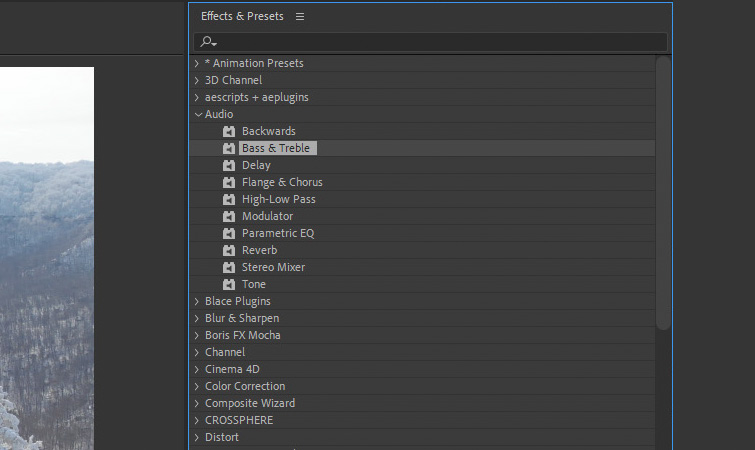
While After Effects is not a replacement for a DAW, it includes a suite of functional audio effects found under the Effects > Audio menu. These tools are designed for quick fixes and creative sound manipulation within the timeline:
- Backwards: Reverses the audio clip, often used for sound design "risers" or psychological thriller aesthetics.
- Bass & Treble: Provides basic equalization (EQ) to boost low-end frequencies or enhance clarity in the high-end.
- Modulator: Adds vibrato or tremolo effects by modulating the pitch or volume.
- Reverb: Simulates different acoustic environments, from small rooms to large cathedrals, helping to "place" a sound within the visual space of a scene.
- Stereo Mixer: Allows for the adjustment of panning and the balance between the left and right channels.
Despite these options, industry experts generally recommend that comprehensive sound mixing be performed in Adobe Premiere Pro or Adobe Audition. The prevailing workflow involves creating the visual assets in After Effects and then "round-tripping" the project to a video editor or audio engineer for the final sound mix.
Industry Implications and Future Trends
The integration of audio in After Effects is currently undergoing a shift driven by Artificial Intelligence and machine learning. Adobe Sensei, the company’s AI framework, is increasingly being used to automate tasks such as "Auto-Ducking" (automatically lowering music volume during dialogue) and speech-to-text transcription. As these technologies mature, the "Audio to Keyframes" workflow is expected to become more sophisticated, allowing designers to isolate specific instruments or vocal frequencies to drive visual animations.
Furthermore, the rise of spatial audio and 360-degree video has introduced new complexities. Designers must now consider how sound moves in a three-dimensional space, necessitating a deeper understanding of the "Stereo Mixer" and third-party plugins that handle ambisonics.
Conclusion: The Strategic Necessity of Sound
In conclusion, mastering audio in Adobe After Effects is a multifaceted discipline that requires a balance of technical knowledge and creative intuition. By leveraging the Audio and Preview panels, utilizing keyboard shortcuts for efficient navigation, and employing the "Audio to Keyframes" feature for data-driven animation, motion designers can significantly elevate the quality of their output.
While the software remains a visual powerhouse, its audio tools are the "silent partners" that provide structure, rhythm, and emotional depth to the moving image. As the digital landscape continues to evolve toward more immersive and interactive formats, the ability to weave sound and vision into a singular, cohesive experience will remain a defining characteristic of the world’s leading creative professionals. For those looking to expand their toolkit, resources such as the "Epic Free Sound Effects" collections provided by industry leaders like PremiumBeat offer a starting point for experimenting with high-impact cinematic sound design within the After Effects environment.
Related posts: