Master the Art of Color Correction A Comprehensive Guide to Achieving Pristine Whites and Neutralizing Color Casts in Professional Video Production


The integrity of visual storytelling relies heavily on the accuracy of color representation, a discipline known in the film industry as colorimetry. One of the most frequent challenges faced by cinematographers and editors alike is the presence of unwanted color casts, particularly yellow or orange tints that muddy the white areas of a frame. These artifacts often stem from improper in-camera white balance settings or the complexities of mixed lighting environments. While traditional temperature adjustments can sometimes resolve these issues, they often shift the entire color spectrum, leading to unnatural skin tones or distorted secondary colors. Modern post-production workflows, specifically those utilizing the Lumetri Color engine within Adobe Premiere Pro, now offer a more surgical approach to neutralizing these casts without compromising the overall aesthetic of the footage.
The Technical Foundation of Color Temperature and White Balance
To understand why color casts occur, one must look at the physics of light. Light is measured on the Kelvin (K) scale, representing color temperature. Standard daylight is typically rated around 5,600K, appearing relatively neutral or slightly blue, while tungsten or incandescent lighting sits much lower on the scale, around 3,200K, emitting a warm, orange-yellow glow.
When a camera is set to a "Daylight" white balance but is used to film under tungsten lights, the resulting footage will appear excessively orange. Conversely, if the camera expects the warm glow of tungsten but receives daylight, the image will turn blue. The problem for editors arises when the white balance is only "slightly" off—perhaps due to a 5,000K LED being used in a 5,600K environment. This creates a subtle but distracting yellow tint in the highlights and midtones, particularly visible in white clothing, snow, or studio backgrounds.

Industry data suggests that color correction accounts for approximately 25% to 35% of the total time spent in the post-production phase of high-end commercial video. The demand for "clean whites" is not merely an aesthetic preference; it is a psychological requirement. In advertising, clean whites are associated with hygiene, modernity, and premium quality. Consequently, mastering the removal of yellow tints is a fundamental skill for any professional editor.
The Chronology of a Precision Color Correction Workflow
Correcting a specific color cast requires a departure from global adjustments—such as the basic "Temperature" and "Tint" sliders—and a move toward selective color manipulation. The following chronology outlines the professional standard for isolating and neutralizing yellow casts using the Lumetri Color panel.
Phase I: Application and Scopes Setup
The process begins with the application of the Lumetri Color effect to the desired clip on the timeline. Before making any visual adjustments, professional editors rely on the Vectorscope YUV. This scope provides a circular representation of the hue and saturation within the frame. A yellow cast will manifest as a concentration of data points leaning toward the yellow and orange vectors on the scope. By monitoring the scope, the editor can ensure that their adjustments are mathematically accurate rather than relying solely on a calibrated or uncalibrated monitor.
Phase II: Navigating the Curves Tab
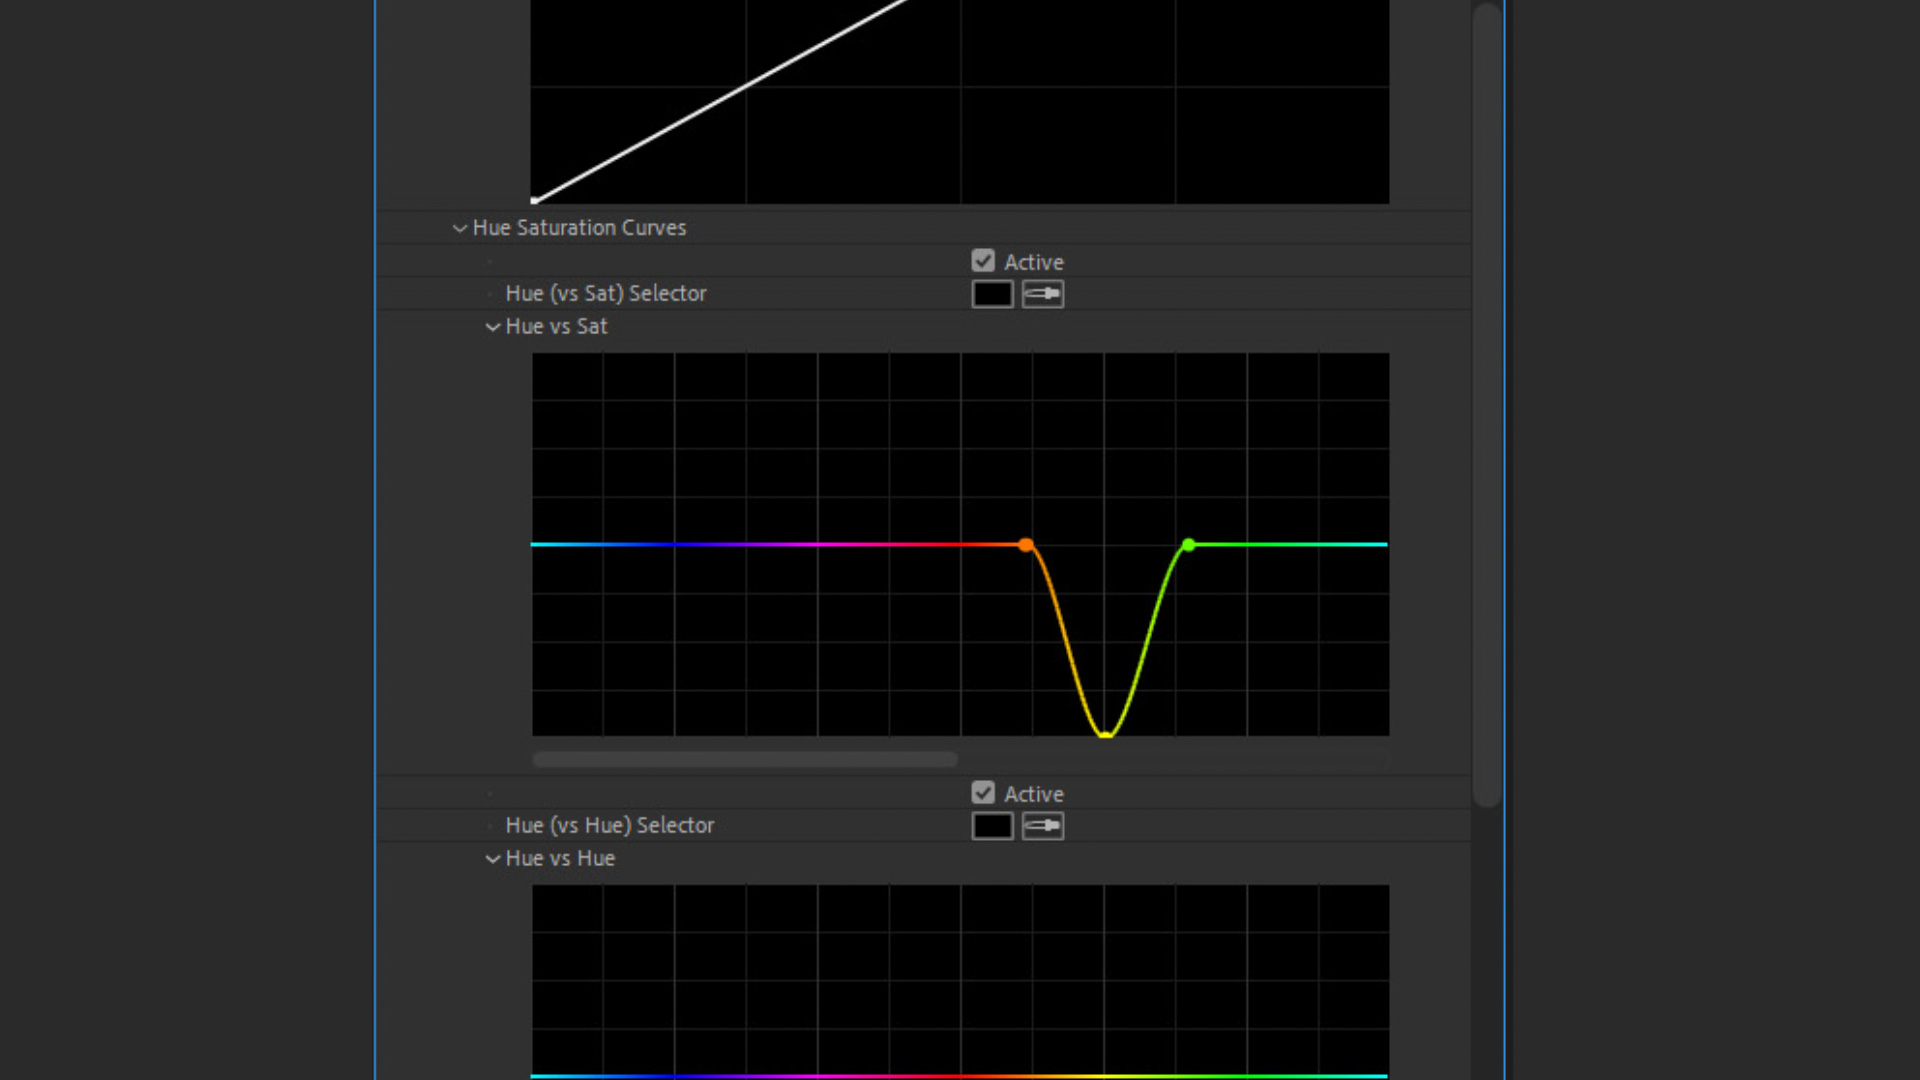
Within the Lumetri Color effect controls, the "Curves" tab provides several specialized tools. While the RGB Curves are used for luminance and contrast, the "Hue vs. Sat" (Hue versus Saturation) curve is the primary tool for this correction. This curve is represented as a horizontal rainbow-colored line. It allows the editor to select a specific range of colors (the Hue) and increase or decrease their intensity (the Saturation) without affecting any other colors in the image.

Phase III: The Three-Point Anchor System
To remove a yellow cast with surgical precision, the editor must create a "window" on the Hue vs. Sat curve. This is achieved by placing three points on the line:
- The Orange Point: Acts as the left anchor, protecting skin tones and warm reds.
- The Yellow Point: The target point located directly in the center of the yellow spectrum.
- The Green Point: Acts as the right anchor, protecting foliage and cool-toned backgrounds.
By dragging the central yellow point downward toward the bottom of the graph, the editor reduces the saturation of only the yellow frequencies. This "pulls" the yellow out of the white areas of the footage, effectively neutralizing the cast and leaving behind a clean, neutral white.
Supporting Data: Why Curves Outperform Basic White Balance
Technical analysis of digital sensors reveals that global white balance shifts can introduce "chromatic noise" in the shadows. When an editor uses a global slider to "cool down" an orange image, they are adding blue to the entire frame. If the shadows already contain blue noise, this adjustment can degrade the image quality.
By contrast, the Hue vs. Saturation curve method is non-destructive to the rest of the color spectrum. For instance, in a shot of a person pouring sugar into a glass of water, a global shift might turn the person’s skin pale or blue. However, by using the three-point curve method, the yellow tint in the sugar and the glass is removed while the natural warmth of the subject’s skin remains untouched.
Addressing Complex White Balance Issues in Mixed Lighting
A significant challenge in modern cinematography is "mixed lighting," where a scene is illuminated by two different light sources with different color temperatures. A common example is a white horse running on a beach at sunrise. The sunlight provides a deep orange glow, while the ambient sky light provides blue fill.
In such scenarios, a standard white balance adjustment is impossible because the "correct" setting for the sun is "incorrect" for the sky. The Hue vs. Saturation trick is particularly effective here. By targeting the orange and yellow hues specifically, an editor can desaturate the "hot" highlights on the horse’s coat, making the animal appear naturally white while maintaining the beautiful blue and purple hues of the morning sky. This level of control is what separates professional-grade color grading from amateur editing.
Professional Responses and Industry Standards
Leading colorists from major post-production houses often emphasize the "Less is More" philosophy. When asked about the most common mistakes in color correction, the consensus points toward over-saturation and the failure to maintain "legal" whites.
"The goal isn’t to remove all color," notes one senior colorist. "The goal is to remove the distraction. If the viewer notices the white balance, the editor has failed. Using Hue vs. Sat curves allows us to maintain the mood of the scene while ensuring the technical specs of the whites are within broadcast standards."

Furthermore, the rise of High Dynamic Range (HDR) delivery has made color cast removal even more critical. In HDR, highlights are much brighter and colors are more vibrant. A slight yellow tint that might go unnoticed in Standard Definition (SD) becomes glaringly obvious and visually unpleasant on a 1,000-nit HDR display.
Broader Implications for the Future of Post-Production
The shift toward more granular color control reflects a broader trend in the software industry: the democratization of high-end tools. Features like Lumetri Color, which were once reserved for expensive, dedicated color-grading suites like DaVinci Resolve or Autodesk Lustre, are now available to any creator with a standard Creative Cloud subscription.
As Artificial Intelligence (AI) continues to integrate with video editing software, we are seeing the emergence of "Auto-Match" and "Auto-White Balance" features. However, the human eye and the technical understanding of curves remain irreplaceable. AI often struggles with artistic intent; it may see the warm glow of a sunset as a "mistake" to be corrected, whereas a human editor understands that the yellow should be reduced in the highlights but preserved in the atmosphere.
Conclusion: The Path to Visual Excellence
Achieving cleaner whites is a fundamental step in elevating the production value of any video project. By moving beyond basic sliders and embracing the precision of the Lumetri Color Hue vs. Saturation curves, editors can solve problematic white balance issues that were previously thought to be "unfixable" in post-production.

The process—applying Lumetri, navigating to Curves, anchoring the orange and green, and desaturating the yellow—is a workflow that balances technical necessity with artistic integrity. As the industry moves toward higher resolutions and more demanding display standards, the ability to deliver a clean, neutral, and professional image will remain the hallmark of a skilled editor. Whether working on a 15-second social media ad or a feature-length documentary, the pursuit of the perfect white is a journey toward visual clarity and storytelling excellence.