Mastering Post-Production Color Correction: How to Achieve Pristine Whites by Eliminating Unwanted Yellow Casts Using Premiere Pro


Achieving accurate color representation in digital cinematography has long been one of the most persistent challenges for video editors and colorists alike. Among the myriad hurdles encountered in post-production, managing incorrect white balance remains a primary obstacle. When footage is captured with a white balance that is even slightly miscalibrated, the resulting imagery often suffers from an unwanted yellow or orange tint. While traditional global color temperature adjustments can sometimes mitigate the issue, they frequently compromise the overall color integrity of the scene, making natural-looking corrections notoriously difficult to achieve.
To address this technical hurdle, professional post-production workflows increasingly rely on targeted secondary color correction techniques. Industry professionals working within non-linear editing systems, specifically Adobe Premiere Pro, have developed streamlined methodologies to isolate and neutralize unwanted color casts without disrupting the broader palette of a shot. By utilizing advanced curve-based adjustments within the Lumetri Color panel, editors can selectively desaturate problematic hues, transforming muddy, warm-tinted highlights into crisp, professional-grade visuals.

The Technical Challenge of White Balance Calibration
White balance is the foundational process of removing unrealistic color casts so that objects which appear white in person are rendered white in the final media file. In an ideal production environment, white balance is meticulously calibrated on set using a neutral grey card or a dedicated white reference target under controlled lighting conditions. However, documentarians, event videographers, and independent filmmakers frequently operate in dynamic environments where rapid changes in ambient light—such as shifting cloud cover, mixed interior artificial lighting, or unexpected sunset hues—make precise in-camera calibration nearly impossible.
When capture devices register ambient light as too warm, the color temperature leans heavily toward the lower end of the Kelvin scale, introducing a pervasive yellow or orange hue. Historically, attempting to correct this in post-production by globally shifting the temperature slider toward the cool end often results in greenish skin tones or an unnatural magenta shift in the shadows. This limitation necessitates a more surgical approach to color grading, shifting focus from global white balance slider manipulations to localized hue and saturation controls.
Step-by-Step Methodology: Isolating and Neutralizing Yellow Casts
To effectively eliminate unwanted warm color casts from highlights and white surfaces without altering the integrity of surrounding colors, editors can utilize the Hue vs. Saturation curve within Adobe Premiere Pro’s Lumetri Color effect. This advanced tool allows for precise control over specific color ranges, enabling the selective reduction of saturation for targeted wavelengths of light.

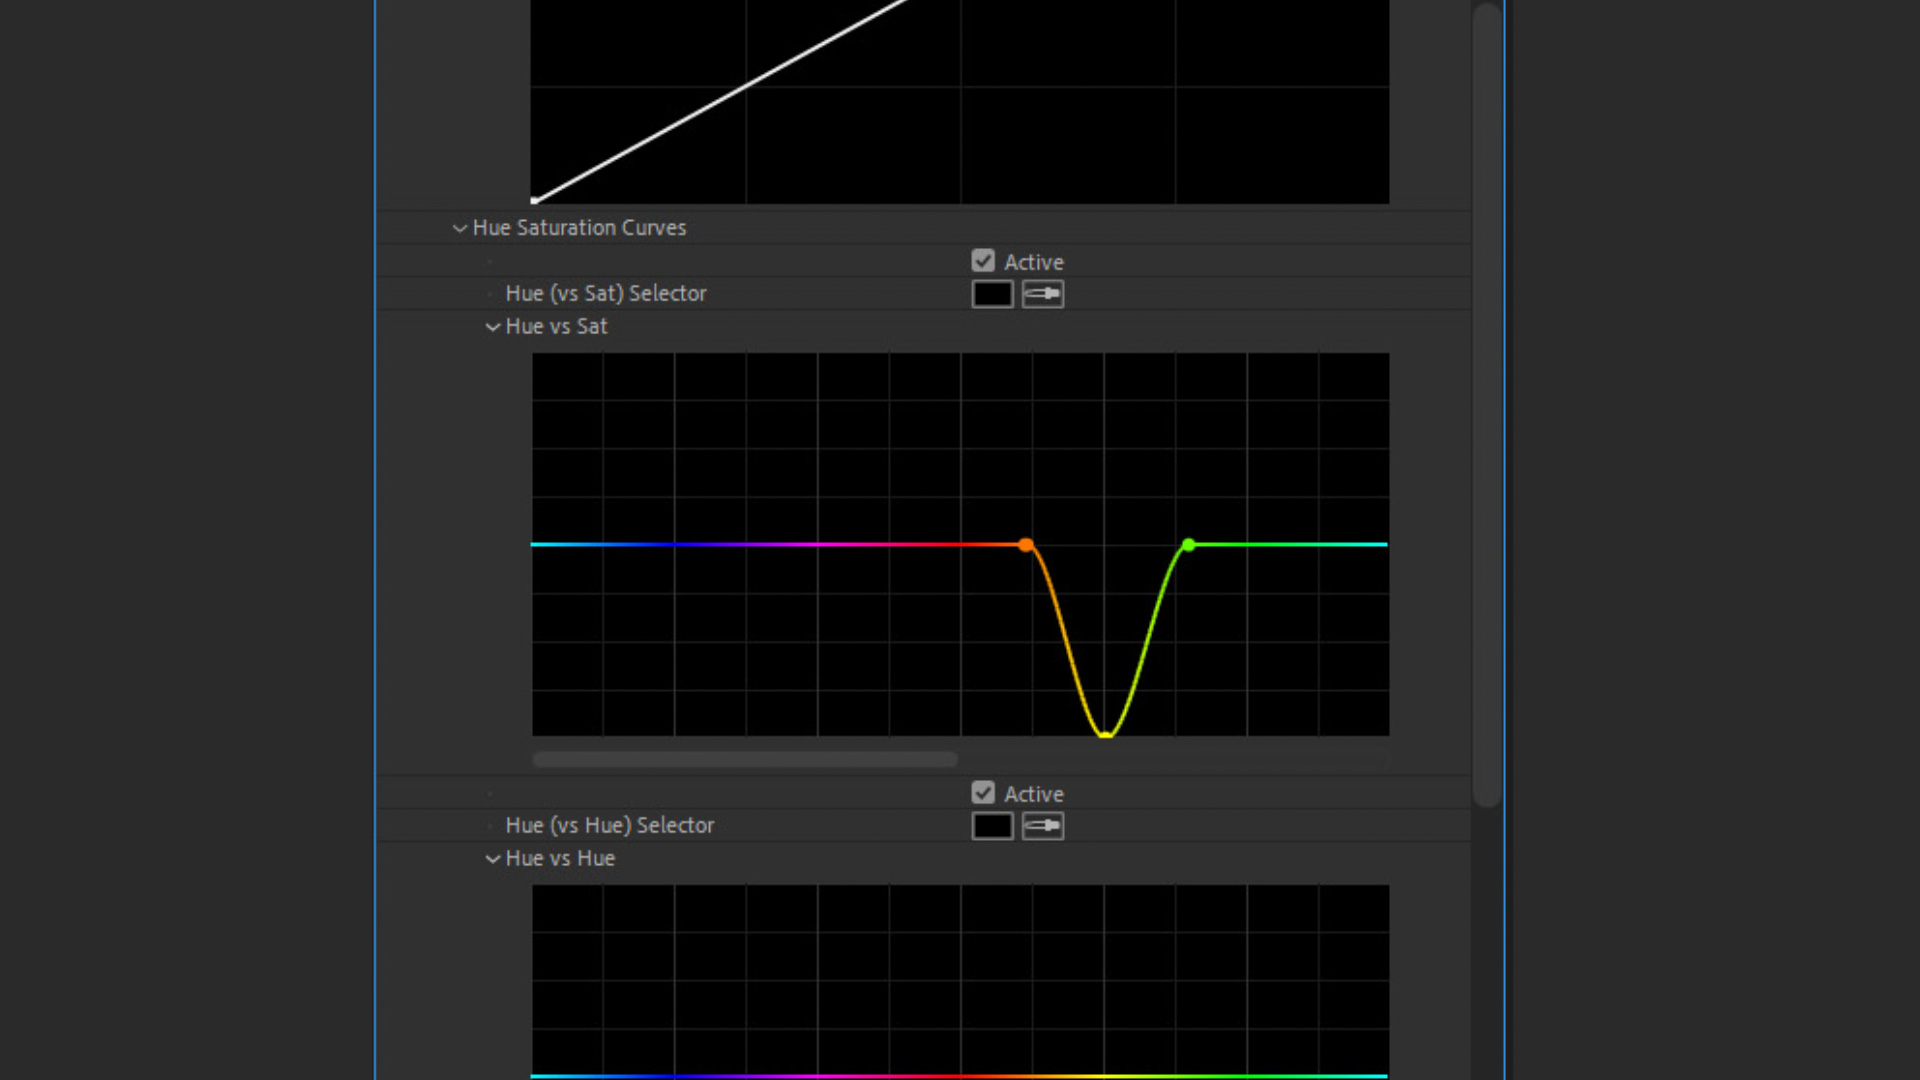
The procedure begins by applying the Lumetri Color effect to the targeted clip on the timeline. Within the effect controls panel, the operator navigates to the Curves tab and selects the Hue vs. Sat (Color Hue vs. Saturation) graph. This interface presents a horizontal gradient line representing the color spectrum, paired with a vertical axis that dictates saturation levels.
To isolate the problematic yellow tones without affecting adjacent hues, editors must establish a containment boundary by placing three distinct control points on the spectrum line. Specifically, points should be anchored on the orange, yellow, and green segments of the curve. These outer anchor points on the orange and green wavelengths act as pins, ensuring that skin tones and foliage remain entirely unaffected by the adjustment.
Once the containment points are secured, the central yellow point can be manipulated. By dragging the yellow control point downward toward the bottom of the graph, the editor directly reduces the saturation of the yellow spectrum within the footage. Depending on the severity of the original color cast, this point can be adjusted halfway or pulled entirely to the floor of the graph. The immediate visual result is the dissipation of the muddy yellow tint, allowing true whites and neutral grey tones to emerge cleanly.
Application Across Diverse Production Scenarios
The versatility of this targeted desaturation technique extends across various genres of videography, from controlled studio product shots to expansive outdoor natural lighting scenarios.
Consider a tabletop product videography sequence featuring a preparation process, such as pouring powder into a glass of liquid under warm studio lamps. In such setups, overhead tungsten or warm LED lighting can inadvertently cast a heavy yellow hue across porcelain surfaces, glassware highlights, and reflective materials. Applying the three-point Hue vs. Sat curve adjustment immediately neutralizes this warmth, returning the whites to a pristine state and enhancing the perceived cleanliness and commercial appeal of the product.
Similarly, exterior natural-history or cinematic b-roll shot during the golden hour often suffers from an excessively warm white balance. While a warm aesthetic is occasionally desirable, excessive orange casts can obscure the natural details of white subjects, such as white animals moving across a landscape at sunrise. By placing the initial adjustment points slightly further into the orange spectrum on the curve and executing a controlled downward drag, colorists can retain the warm, cinematic ambiance of the sunrise while stripping away the heavy, distracting orange color contamination from the highlights. This balance ensures that the artistic intent of the scene remains intact while achieving technical color accuracy.

Expanding Post-Production Efficiency with Lumetri Color
The reliance on advanced curve-based adjustments underscores a broader evolution in non-linear editing software. Modern editing suites like Premiere Pro have democratized high-end color grading techniques that were once exclusive to dedicated color-grading suites utilizing proprietary hardware. By mastering tools such as the Hue vs. Sat curves, editors can bypass time-consuming masking and keying workflows, saving valuable hours in the post-production pipeline.
Industry analysts note that efficiency in post-production workflows directly correlates with higher project throughput and reduced operational costs for creative agencies and independent production houses. As cameras continue to evolve and capture wider dynamic ranges and color spaces, the demand for precise, non-destructive color correction methods will only continue to grow.
For practitioners seeking to further elevate their color grading proficiency, integration of Look-Up Tables (LUTs) alongside native Lumetri controls offers an additional layer of professional polish. However, foundational corrective measures—such as eliminating unwanted yellow and orange casts through targeted saturation curves—must always precede stylistic grading to ensure a stable, technically sound foundation for the final visual narrative.