Mastering Color Correction Techniques to Eliminate Unwanted Yellow Tints and Enhance Visual Fidelity in Professional Video Editing


In the contemporary landscape of digital cinematography and high-definition broadcasting, the pursuit of visual perfection has moved beyond the lens and into the sophisticated realm of post-production. One of the most persistent challenges faced by editors and colorists is the presence of unwanted color casts, particularly the yellow and orange tints that frequently plague white surfaces in video footage. This phenomenon, often a byproduct of improper white balance settings during the production phase, can compromise the perceived quality of a project, making professional-grade footage appear amateurish or poorly lit. As the demand for high-fidelity content grows across platforms like Netflix, YouTube, and traditional television, the mastery of tools such as the Lumetri Color engine in Adobe Premiere Pro has become a fundamental requirement for industry professionals.
The Technical Evolution of Color Correction
The science of color correction has undergone a radical transformation since the transition from analog film to digital sensors. In the era of chemical film, correcting a color cast required physical filters or complex lab processes. Today, the process is mathematical and non-destructive. The yellow tint that often appears on white objects—such as sugar, snow, or white clothing—is typically the result of a mismatch between the camera’s white balance setting and the color temperature of the ambient light, measured in Kelvin.
When a camera is set to a "Daylight" preset (approximately 5600K) but is filming under "Tungsten" or warm indoor lighting (approximately 3200K), the resulting image will lean heavily toward the warmer end of the spectrum. While a global white balance adjustment is the standard first step in correction, it often fails to address specific color contamination without affecting the skin tones or other vital elements of the frame. This has led to the widespread adoption of more surgical methods, specifically the use of Hue versus Saturation curves.

The Methodology of Targeted Desaturation
Industry experts have identified a streamlined workflow for neutralizing these stubborn yellow casts without compromising the integrity of the overall color grade. The process centers on the Lumetri Color effect, specifically the "Curves" tab, which offers a level of precision that basic sliders cannot match.
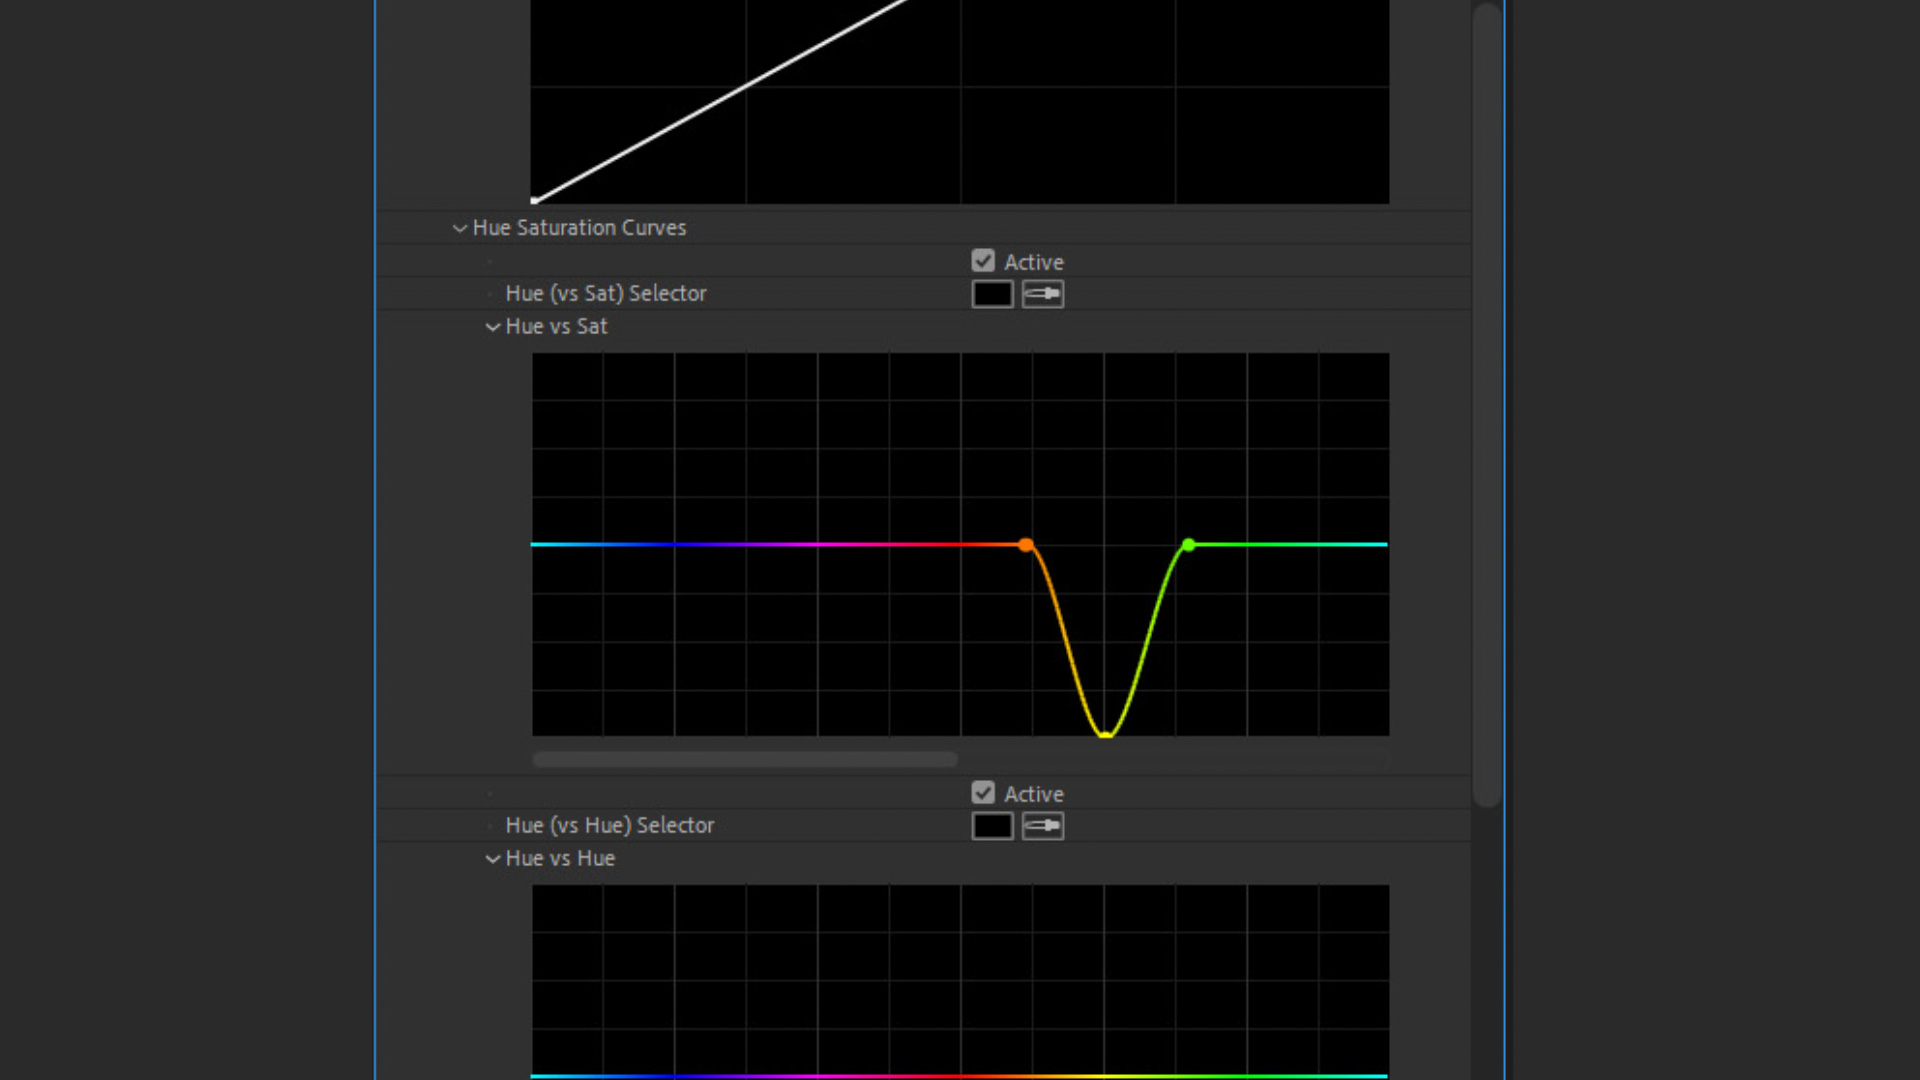
The primary tool for this correction is the Hue vs Sat (Hue versus Saturation) curve. Unlike global saturation controls, this curve allows an editor to select a specific slice of the color spectrum and adjust its intensity independently. To achieve "cleaner" whites, the technician identifies the problematic yellow-orange range on the rainbow-colored horizontal line that represents the spectrum.
The procedure involves a strategic "three-point" anchoring system. By placing control points on the Orange, Yellow, and Green sections of the curve, the editor creates a localized "well." The central Yellow point is then dragged downward, effectively draining the saturation from only that specific hue. Depending on the severity of the color cast, the point may be lowered halfway or entirely to the baseline. This targeted approach ensures that while the yellow tint is removed from the white highlights, the blues of the sky or the reds of a subject’s clothing remain vibrant and untouched.
Historical Context and the Rise of the Lumetri Engine
The integration of such advanced tools into standard editing software marks a significant shift in the industry’s chronology. Prior to the mid-2010s, advanced color grading was often outsourced to specialized facilities using expensive hardware like DaVinci Resolve panels. However, with the introduction of the Lumetri Color panel in Adobe Premiere Pro CC 2015—which incorporated technology from Adobe’s dedicated SpeedGrade software—professional-grade color tools became accessible to the general editing population.

This democratization of color grading has coincided with a shift in aesthetic standards. The "clean white" look, often associated with high-end commercial advertising and pharmaceutical photography, has become a benchmark for quality. A yellow or orange cast on a white product is often perceived by viewers as "dirty" or "aged," which can subconsciously negatively impact brand perception. Consequently, the ability to "clean" whites has evolved from a technical fix to a vital component of visual storytelling and marketing.
Comparative Data and Technical Analysis
Technical analysis of digital sensors reveals why yellow casts are so prevalent. Most modern CMOS sensors are more sensitive to green and red light than blue. In low-light or warm-light environments, the blue channel—which is necessary to balance out yellow—often suffers from a lower signal-to-noise ratio. When an editor attempts to fix this using a global temperature slider, they are essentially boosting the blue channel across the entire image.
Data from post-production surveys suggests that global adjustments lead to "color spill" in approximately 65% of cases where a specific object is the primary concern. For example, in a shot of white horses running on a beach at sunrise, a global cooling of the temperature might fix the horses’ coats but would turn the warm, golden sand into an unnatural grey or blue. By contrast, the Hue vs Sat curve method allows for the retention of the golden hour atmosphere while specifically neutralizing the orange-yellow tint on the horses’ white fur.
Industry Responses and Professional Implications
The reaction from the cinematography community toward these localized correction techniques has been overwhelmingly positive. Lead colorists at major post-production houses have noted that these "quick tips" are essential for maintaining fast turnaround times in the era of daily content cycles.
"The goal is no longer just to make the image look ‘correct,’ but to make it look ‘expensive,’" says one senior colorist based in Los Angeles. "Removing the ‘muddy’ yellows from your whites is the fastest way to increase the perceived production value of a shot. It creates a crispness that mimics the look of high-end Alexa or RED sensors, even if the footage was captured on a mid-range DSLR."
Furthermore, software developers have responded to this need by refining the UI of curve controls. Recent updates to NLE (Non-Linear Editing) platforms have improved the granularity of these curves, allowing for smoother transitions between the adjusted hue and the neighboring colors, thus preventing "banding" or digital artifacts that used to occur with aggressive desaturation.
Broader Impact on Global Content Creation
The implications of these technical refinements extend far beyond the editing suite. As the global "Creator Economy" continues to expand—now valued at over $250 billion—the gap between professional and amateur content is narrowing. Small-scale creators are now utilizing these professional-grade color techniques to compete with traditional media outlets.
Moreover, the rise of AI-driven color grading tools has begun to automate some of these processes. However, industry analysts argue that manual control over curves remains superior for creative decision-making. AI often struggles with the nuance of "artistic intent"—knowing when a yellow cast is a "mistake" (like a bad white balance) versus when it is a "choice" (like the warmth of a candlelit dinner). The manual Hue vs Sat method remains the gold standard for editors who require absolute precision.

Chronology of a Typical Color Correction Workflow
To understand where this technique fits into the broader production timeline, one must look at the standard professional pipeline:
- Ingest and Primary Correction: Footage is brought into the NLE. Exposure, contrast, and basic white balance are adjusted to normalize the image.
- Secondary Correction (The Subject of this Report): Specific issues, such as the yellow tint on whites or skin tone inconsistencies, are addressed using targeted tools like Hue vs Sat curves.
- Creative Grading: LUTs (Look-Up Tables) or stylistic color choices are applied to give the film a specific "mood."
- Quality Control (QC): The footage is viewed on calibrated monitors to ensure the whites are truly neutral and do not lean toward a "digital blue" or "sickly yellow."
Conclusion: The Future of Visual Clarity
As display technology advances toward 8K resolution and High Dynamic Range (HDR), the margin for error in color grading continues to shrink. In an HDR environment, a color cast is even more apparent to the human eye, as the increased brightness range exaggerates any hue imbalances in the highlights.
Mastering the removal of yellow tints through Lumetri Color is more than a "quick tip"—it is a foundational skill in the modern digital darkroom. By leveraging the Hue vs Sat curve, editors can ensure their footage maintains a level of "cleanliness" and professionalism that meets the rigorous standards of today’s media consumers. As the industry moves forward, the intersection of technical proficiency and artistic intuition will continue to define the pinnacle of visual excellence in the digital age.
Related posts: